AI prompts
base on Click-to-run debian 12 with desktop environment on android for Chinese users, with fcitx pinyin input method and some useful packages preinstalled. You don't need to install Termux. [](https://github.com/Cateners/tiny_computer/blob/master/readme/cover0.png)
# 小小电脑
给所有安卓 9 以上 arm64 设备的“PC 应用引擎”平替。你可以在小小电脑上安装 PC 级 WPS、CAJ Viewer、亿图图示等软件。
Run Debian Bookworm with XFCE, LXQt, or other desktop environments on Android—just with one click. Originally developed for Chinese users to run applications like WPS Office, it comes preinstalled with tools such as the Fcitx Pinyin input method. Please note that this app does not require Termux.
To change the language inside the container, simply run the `tmoe` command, select “Manager” and navigate to the locale settings. The root filesystem was built using [tmoe](https://github.com/2moe/tmoe), so locale configuration is handled through it. You will also need to update the `LANG=zh_CN.UTF-8` environment variable in the startup command (go to Control → Advanced Settings → Startup Command) when switching to another language.
Note: English UI is supported since version 1.0.23, though some hint texts may still appear in Chinese.
As of version 1.0.100, the container will automatically switch to English if it detects that your device is not using Chinese.
## 特点
- 一键安装,即开即用
- 来自 kali-undercover 的 win10 主题(仅 xfce 版本),友好的界面

- 提供常用软件的一键安装指令(点击图片可查看更多说明)
[](https://gitee.com/caten/tc-hints/blob/master/pool/solution.md)
- 可方便地改变屏幕缩放,不用担心屏幕过大或过小 (点击图片可查看更多说明)
[](https://gitee.com/caten/tc-hints/blob/master/pool/scale.md)
- 便捷访问设备文件,或通过设备 SAF 访问软件文件(点击图片可查看更多说明)
[](https://gitee.com/caten/tc-hints/blob/master/pool/fileaccess.md)
- 提供终端和众多可调节参数供高级用户使用

## 下载
小小电脑提供多个版本。要将小小电脑作为 PC 应用引擎使用,请在 [Releases](https://github.com/Cateners/tiny_computer/releases) 页面下载并安装 [XFCE](https://xfce.org/) 版本(tiny-computer-xfce.apk)。
如果遇到黑屏问题,请卸载后尝试 [LXQt](https://lxqt-project.org/) 版本([Releases](https://github.com/Cateners/tiny_computer/releases) 页寻找 tiny-computer-lxqt.apk)。
这些版本的区别在于桌面环境不同。你可以简单地理解为界面不一样,但功能基本一致。
LXQt 的界面示例:
[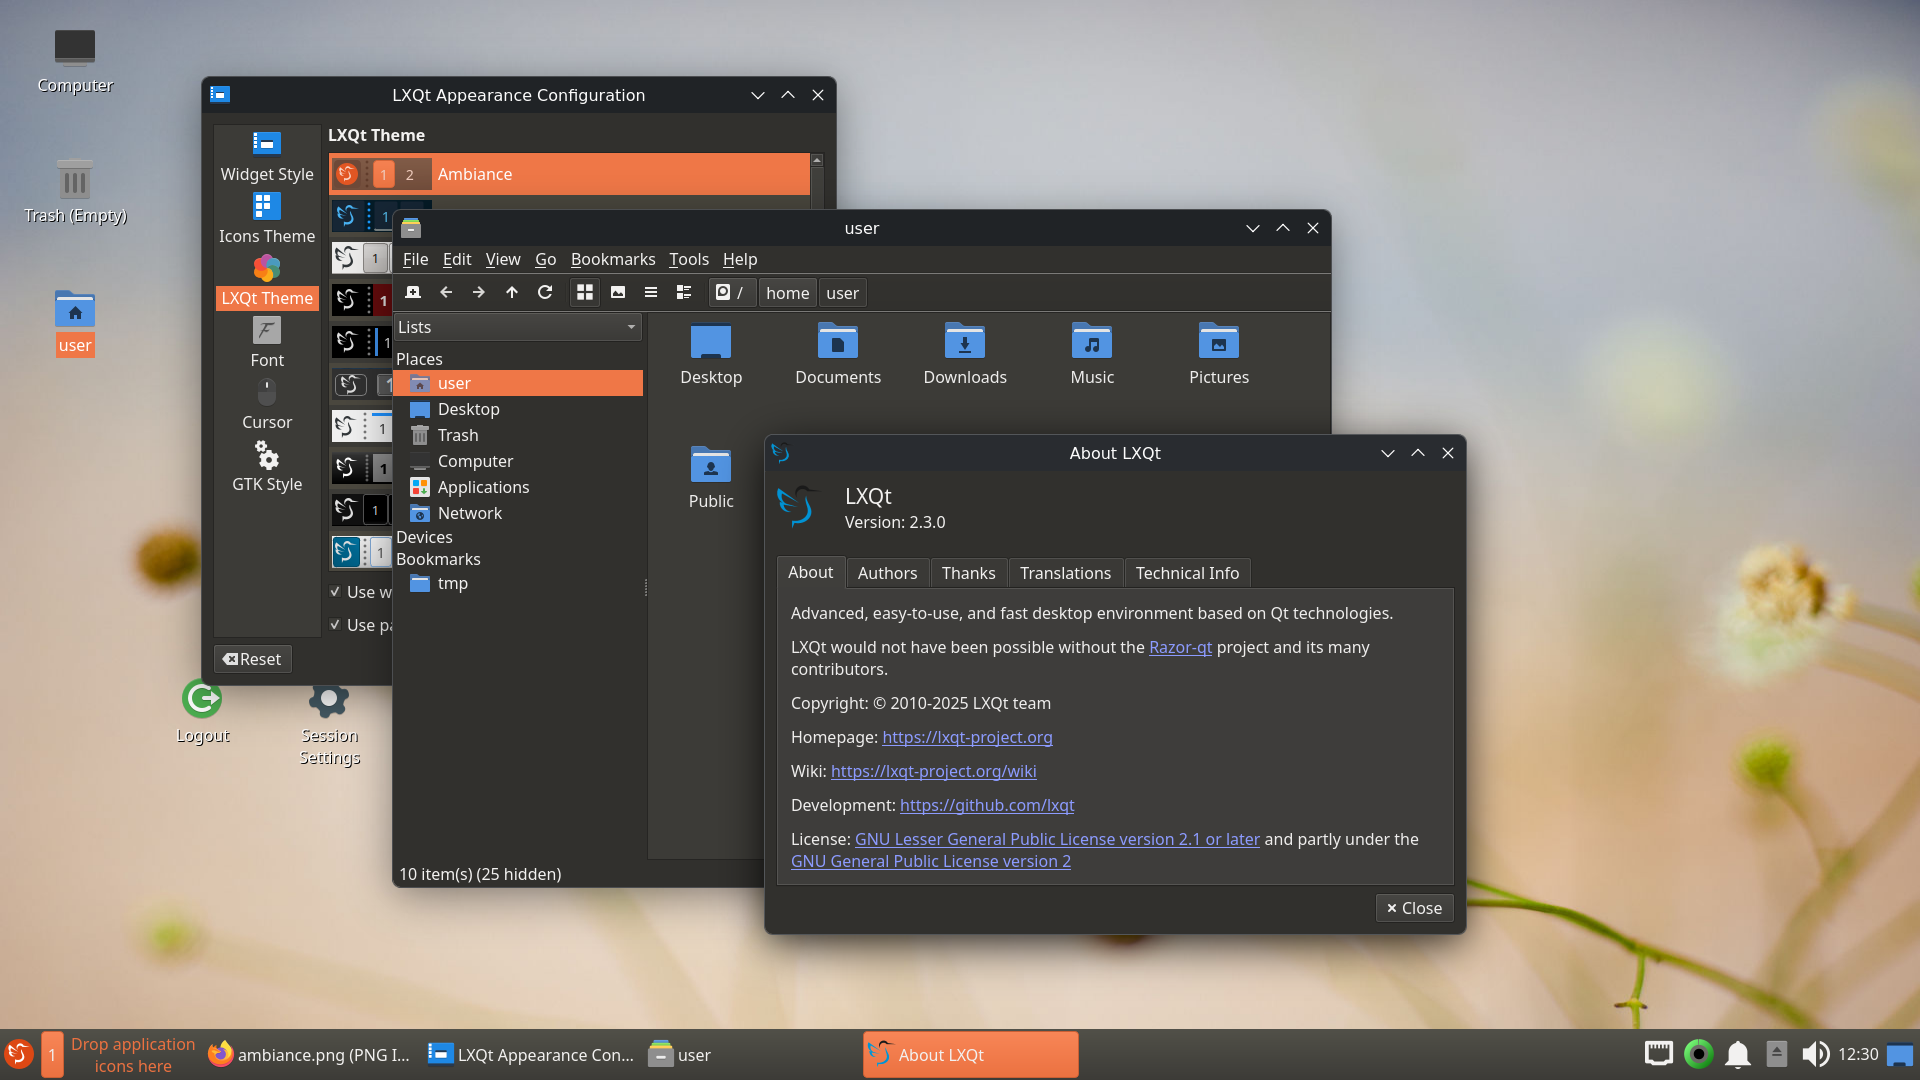](https://camo.githubusercontent.com/016ff8803c228f26db750c8424777d8e04a3aebec4ff11d8436a0b22a2e6f58a/68747470733a2f2f6c7871742d70726f6a6563742e6f72672f696d616765732f73637265656e73686f74732f616d6269616e63652e706e67)
如果你下载小小电脑是为了体验更多桌面环境,享受折腾 Linux 的乐趣,这里也有一些其他版本供下载!
和 [GXDE](https://www.gxde.org/) 团队合作的版本 [#129](https://github.com/Cateners/tiny_computer/issues/129)。可在[此处](https://mirrors.sdu.edu.cn/spark-store-repository/GXDE-OS/APK/)下载。GXDE 的界面示例:
[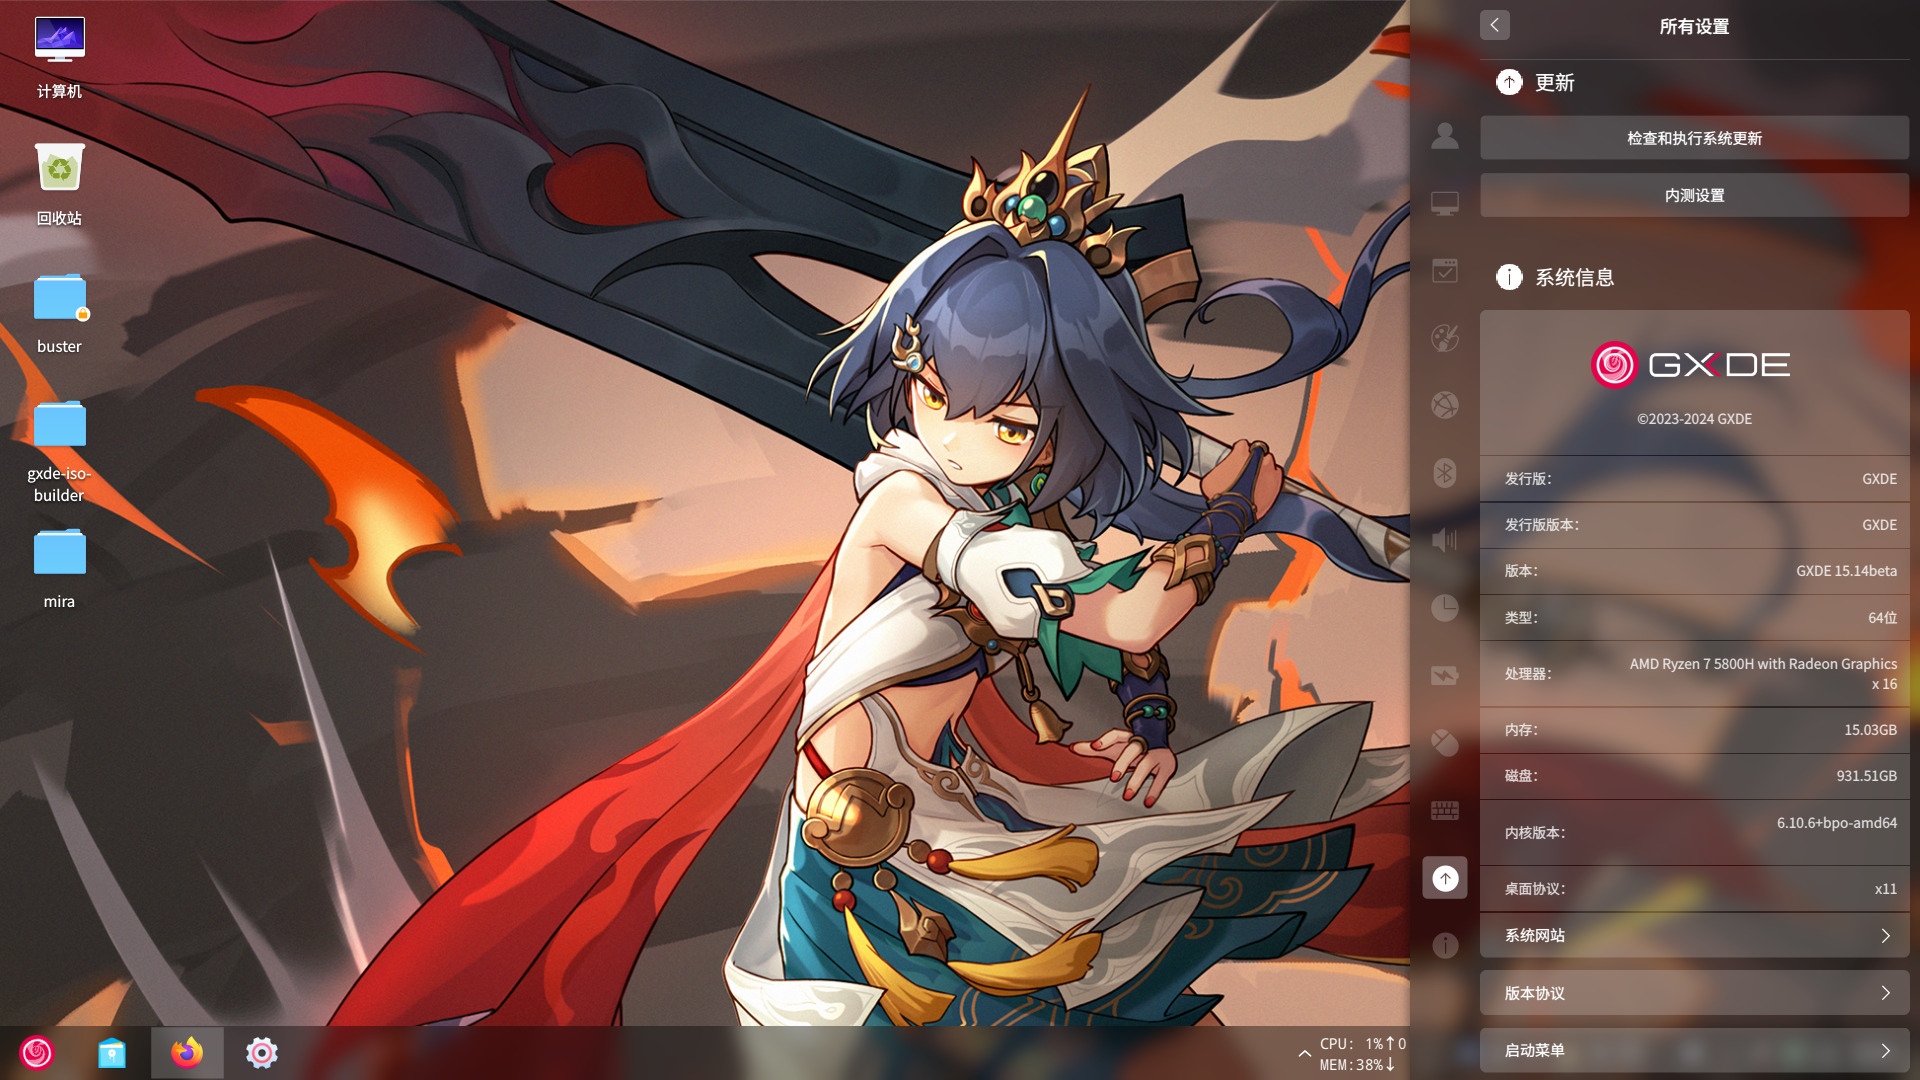](https://www.gxde.top/1.jpg)
由[灵墨桌面](https://www.lingmo.org/)开发者提供的版本[#218](https://github.com/Cateners/tiny_computer/issues/218)。灵墨桌面的界面[示例](https://www.bilibili.com/video/BV1Ci421R7AR)。
## 原理
使用 proot 运行 debian 环境。
内置 [noVNC](https://github.com/novnc/noVNC)/[AVNC](https://github.com/gujjwal00/avnc)/[Termux:X11](https://github.com/termux/termux-x11) 显示图形界面。
## 项目结构
assets 和 android/app/src/main/jniLibs 的文件源信息可以在[这里](https://github.com/Cateners/tiny_computer/blob/master/extra/readme.md)找到。
完整的容器制作过程可以在[这里](https://github.com/Cateners/tiny_computer/blob/master/extra/build-tiny-rootfs.md)看到。
数据包、patch.tar.gz 以及 jniLibs 的文件不在代码仓更新,而是随 releases 提供,主要是为了避免 git 越来越大。
lib 目录:
- main.dart 文件,页面布局,有点乱
- workflow.dart 文件,逻辑部分,目前也还可以理解
- Util 工具类
- TermPty 一个终端
- G 全局变量类
- Workflow 从软件点开到容器启动的所有步骤
- l10n 文件夹,包含多语言文件
## 编译
你需要配置好 flutter 和安卓 sdk。
在编译之前,需要在 release 中下载 jniLibs.zip ,将里面的库文件解压后放到 android/app/src/main/jniLibs/arm64-v8a;下载 patch.tar.gz 拷贝到 assets。以及下载系统 rootfs(或者[自行制作](https://github.com/Cateners/tiny_computer/blob/master/extra/build-tiny-rootfs.md)),之后使用 split 命令分割,拷贝到 assets。一般我将其分为 98MB。
```bash
split -b 98M debian.tar.xz
```
接下来就可以编译了。如果要编译release版本,需要设置发布密钥,可以参考android/keystore.properties.example文件。
我使用的编译命令如下:
```bash
flutter build apk --target-platform android-arm64 --split-per-abi --obfuscate --split-debug-info=tiny_computer/sdi
```
## 目前已知 bug
多用户/分身情形无法 sudo , 其它见 issue。
## 一些链接
这是我的第一个 flutter 软件,感谢这些项目为我指路
- 要一点基础的[《Flutter实战·第二版》](https://book.flutterchina.club/)
- 也许是零基础的Flutter视频课程 [freeCodeCamp Flutter Course](https://www.youtube.com/watch?v=wFn-m-OgKPU&list=PL6yRaaP0WPkVtoeNIGqILtRAgd3h2CNpT)
- 安卓上的 VS Code [Code FA](https://github.com/nightmare-space/vscode_for_android)
## Getting Started
This project is a starting point for a Flutter application.
A few resources to get you started if this is your first Flutter project:
- [Lab: Write your first Flutter app](https://docs.flutter.dev/get-started/codelab)
- [Cookbook: Useful Flutter samples](https://docs.flutter.dev/cookbook)
For help getting started with Flutter development, view the [online documentation](https://docs.flutter.dev/), which offers tutorials, samples, guidance on mobile development, and a full API reference.
", Assign "at most 3 tags" to the expected json: {"id":"12166","tags":[]} "only from the tags list I provide: [{"id":77,"name":"3d"},{"id":89,"name":"agent"},{"id":17,"name":"ai"},{"id":54,"name":"algorithm"},{"id":24,"name":"api"},{"id":44,"name":"authentication"},{"id":3,"name":"aws"},{"id":27,"name":"backend"},{"id":60,"name":"benchmark"},{"id":72,"name":"best-practices"},{"id":39,"name":"bitcoin"},{"id":37,"name":"blockchain"},{"id":1,"name":"blog"},{"id":45,"name":"bundler"},{"id":58,"name":"cache"},{"id":21,"name":"chat"},{"id":49,"name":"cicd"},{"id":4,"name":"cli"},{"id":64,"name":"cloud-native"},{"id":48,"name":"cms"},{"id":61,"name":"compiler"},{"id":68,"name":"containerization"},{"id":92,"name":"crm"},{"id":34,"name":"data"},{"id":47,"name":"database"},{"id":8,"name":"declarative-gui "},{"id":9,"name":"deploy-tool"},{"id":53,"name":"desktop-app"},{"id":6,"name":"dev-exp-lib"},{"id":59,"name":"dev-tool"},{"id":13,"name":"ecommerce"},{"id":26,"name":"editor"},{"id":66,"name":"emulator"},{"id":62,"name":"filesystem"},{"id":80,"name":"finance"},{"id":15,"name":"firmware"},{"id":73,"name":"for-fun"},{"id":2,"name":"framework"},{"id":11,"name":"frontend"},{"id":22,"name":"game"},{"id":81,"name":"game-engine "},{"id":23,"name":"graphql"},{"id":84,"name":"gui"},{"id":91,"name":"http"},{"id":5,"name":"http-client"},{"id":51,"name":"iac"},{"id":30,"name":"ide"},{"id":78,"name":"iot"},{"id":40,"name":"json"},{"id":83,"name":"julian"},{"id":38,"name":"k8s"},{"id":31,"name":"language"},{"id":10,"name":"learning-resource"},{"id":33,"name":"lib"},{"id":41,"name":"linter"},{"id":28,"name":"lms"},{"id":16,"name":"logging"},{"id":76,"name":"low-code"},{"id":90,"name":"message-queue"},{"id":42,"name":"mobile-app"},{"id":18,"name":"monitoring"},{"id":36,"name":"networking"},{"id":7,"name":"node-version"},{"id":55,"name":"nosql"},{"id":57,"name":"observability"},{"id":46,"name":"orm"},{"id":52,"name":"os"},{"id":14,"name":"parser"},{"id":74,"name":"react"},{"id":82,"name":"real-time"},{"id":56,"name":"robot"},{"id":65,"name":"runtime"},{"id":32,"name":"sdk"},{"id":71,"name":"search"},{"id":63,"name":"secrets"},{"id":25,"name":"security"},{"id":85,"name":"server"},{"id":86,"name":"serverless"},{"id":70,"name":"storage"},{"id":75,"name":"system-design"},{"id":79,"name":"terminal"},{"id":29,"name":"testing"},{"id":12,"name":"ui"},{"id":50,"name":"ux"},{"id":88,"name":"video"},{"id":20,"name":"web-app"},{"id":35,"name":"web-server"},{"id":43,"name":"webassembly"},{"id":69,"name":"workflow"},{"id":87,"name":"yaml"}]" returns me the "expected json"