AI prompts
base on Overlay for running GPU shaders on top of Windows desktop     
## ShaderGlass
Overlay for running GPU shaders on top of Windows desktop.
### Features
* applies shader effects on top of desktop, in a floating window or full-screen
* built-in [RetroArch](https://github.com/libretro/RetroArch) shader library (1200+ shaders!) covering:
* CRT monitor simulation
* image upscaling
* TV, VHS and handheld simulation
* softening, denoising, blur, sharpen and many more
* works with most emulators, retro platforms and pixel art editors including:
* [DOSBox](https://www.dosbox.com/), [FS-UAE](https://github.com/FrodeSolheim/fs-uae), [Altirra](http://www.virtualdub.org/altirra.html),
[ScummVM](https://github.com/scummvm/scummvm), [AGS](https://github.com/adventuregamestudio/ags), [VICE](https://sf.net/projects/vice-emu), [Aseprite](https://www.aseprite.org/) etc.
* excellent companion for pixel art showing shaded and/or aspect-ratio corrected preview
* you can even use it on top of YouTube, Twitch or modern games
* saving and loading profiles
* import of external .slangp/.slang shaders
* high customizability with various options, operating modes and shader parameters
* can be captured by OBS (using Game Capture source)
<br/>
### Download
Latest stable release (v1.1.0, 5 Apr 2025):
* ability to import .slangp/.slang shaders on the fly
* shader library refresh: added koko-aio and retro-crisis
* ability to tag personal favorites
* new frame timing mechanism for smoother capture
* option to save window position
* ability to crop input window (Input -> Window -> Crop)
* 100% FPS now default (+option to remember)
* vertical orientation option (vertical scanlines, i.e. arcade cabinet style)
* option to save defaults
* option to lock scale changes
* advanced menu with DXGI settings
* minor menu rearrangement
https://github.com/mausimus/ShaderGlass/releases/download/v1.1.0/ShaderGlass-1.1.0-win-x64.zip
[Betas and older versions available here](https://github.com/mausimus/ShaderGlass/releases)
<br/>
Follow [ShaderGlass on itch.io](https://mausimus.itch.io/shaderglass) for latest updates.
<br/>
### Requirements
* __Windows 10, version 2004__ (build 19041) or __Windows 11__
* will work on version 1903 but in limited capacity (no Desktop Glass mode)
* Windows 11 allows the __removal of yellow border__ (see [FAQ](FAQ.md#windows-10) for tips on avoiding it on Windows 10)
* DirectX 11-capable GPU
If the app reports missing libraries please install [Visual C++ Redistributable 2019](https://aka.ms/vs/16/release/vc_redist.x64.exe)
<br/>
### Demo
Click to view on YouTube
[](https://www.youtube.com/watch?v=gWOcucS9_mg)
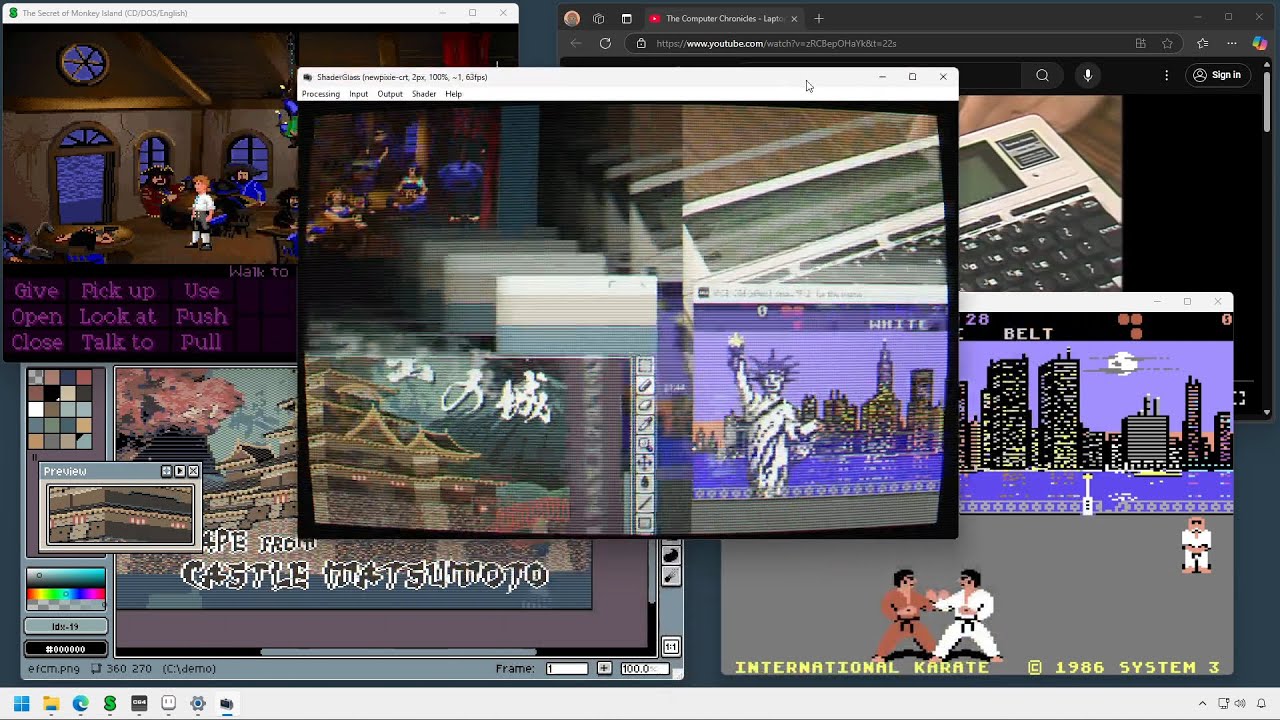
### Screenshots
ShaderGlass running over multiple applications on Windows 11 desktop.

#### Desktop Glass mode
In this mode a transparent floating window will apply a shader to anything behind it.
Requires Windows 10 2004 - on 1903/1909 you will see only a black window if you switch to this mode.
Wikipedia in Chrome processed by crt-geom shader which applies scanlines and CRT curvature.

#### Window Clone mode
When capture is fixed to a specific window it's easier to tune scaling to match the input
and image can also be recaptured (screenshot/OBS etc.)
##### FS-UAE
Amiga version of [The Secret of Monkey Island (1990)](https://store.steampowered.com/app/32360/The_Secret_of_Monkey_Island_Special_Edition/)
running in FS-UAE with crt-interlaced-halation shader applied.

##### Altirra
[Ninja (1986)](https://www.mobygames.com/game/ninja_) for the Atari XL
running in Altirra with a TV-OUT simulation shader.

##### Adventure Game Studio
[The Crimson Diamond (2024)](https://store.steampowered.com/app/1098770/The_Crimson_Diamond/),
a modern AGS game using HSM MegaBezel STD shader.

##### DOSBox
[Police Quest (1987)](https://store.steampowered.com/app/494740/Police_Quest_Collection/)
with its massive half-EGA pixels, aspect-ratio corrected and post-processed using newpixie-crt shader.

[Rick Dangerous (1989)](https://www.mobygames.com/game/rick-dangerous)
with C64 monitor shader applied.

<br/>
### Menu Options
Currently supported options are:
#### Processing
* __Enable Global Hotkeys__ - toggle use of global hotkeys (if they conflict with another app)
* __Show Menu__ - toggle menu bar ('m')
* __Remember Position__ - remember previous window position and size on startup
* __GPU__ - shows the GPU which Windows assigned to ShaderGlass (read-only)
* __FPS__ - by default ShaderGlass runs at V-Sync, you can reduce GPU load by lowering the frame rate (for pixel art etc.)
* __Remember FPS__ - tick so that ShaderGlass remembers and always uses current FPS setting (this overrides any preset)
* __Advanced__ - extra options for lowering latency; these options require restarting ShaderGlass
* __Use Flip Mode__ - uses DXGI Flip Presentation mode (as opposed to BitBlt) which is faster but a little unstable (especially on Windows 10)
* __Allow Tearing__ - removes explicit V-Sync, required for VRR to work
* __Max Capture Rate__ - remove capture frame limit of WGC, only supported since Windows 11 24H2
* __Load/Save/Recent Profiles__ - you can save ShaderGlass' configuration into a profile file and load later
* __Set as default/Remove default__ - make current settings the default when starting up
#### Input
* __Desktop__ - captures the whole desktop or an individual monitor, defaults to Glass mode
* __Lock Current Area__ - always capture current area even if ShaderGlass window is moved
* __Window__ - captures the selected window, defaults to Clone mode
* __Rescan__ - refresh the list of open windows
* __Crop__ - remove border around captured window, if your emulator has a toolbar for example
* __File__ - load a .png or .jpg file as input
* __Pixel Size__ - indicates the size of input pixels (pre-scaling), i.e. if you run a game in x3 scaling mode set this to x3 as well so that ShaderGlass can tell the original resolution
* __Adjust for DPI Scale__ - if your source always applies Windows DPI Scaling when displaying images
(for example browsers) enable this option to take it into account; most emulators don't do this however
* __Capture Cursor__ - whether to include mouse cursor in capture
* __Remove Yellow Border__ - disables yellow frame around captured area (forced security feature); currently only supported on Windows 11
#### Output
* __Mode__ - overrides default mode for the input type:
* __Glass__ (default for Desktop) - ShaderGlass window appears transparent, you have to position it over the window or area you'd like to capture
* __Clone__ (default for Window) - ShaderGlass copies the content of capture so you can position it anywhere; this mode is also faster and more compatible
* __Window__ - override mouse behavior:
* __Solid__ (default for Clone) - ShaderGlass window area is solid (traps mouse events), with the only exception of passing focus to captured window when clicked
* __Click-through__ (default for Glass) - ShaderGlass window area is transparent and clickable/scrollable-through to window(s) underneath
* __Flip__ - flip output image horizontally and/or vertically
* __Scale__ - apply additional scaling to the output if you'd like it to be larger; using no pre-scaling and only output scaling should result in best performance
* __Free__ - allow manual resizing of ShaderGlass window (Window Clone and File modes only)
* __Retain__ - prevent scale from resetting when switching inputs
* * __Aspect Ratio Correction__ - presets for common aspect ratio correction factors (DOS, etc.), applied horizontally to preserve scanline count
* If you select _Custom_ you can enter your own correction ratio expressed as pixel height (1.0 being square pixel). For example,
in MS-DOS era a picture of 320x200 resolution (16:10) was displayed on a 4:3 screen meaning each pixel was 1.2x tall on screen, 1.2 = (16/10) / (4/3)
* __Orientation__ - direction of shader effect, "Vertical" emulates display rotated 90 degrees, like in arcade cabinets
* __Fullscreen__ (Ctrl+Shift+G) - turn ShaderGlass into a topmost fullscreen borderless window, in Glass mode you will still see yellow outline around the screen but if you can use
Window Glass (surrounding black bars) or Window Clone (top-left aligned) with your source then you can avoid yellow edges; press Ctrl+Shift+G to revert
* __Take Snapshot__ - export current image in .png format
#### Shader
* __Choose from Library__ - open Shader Browser to switch the current shader; Shader Library consists of:
* __Personal Favorites__ - you can mark shaders as favorites using Add/Remove Favorite buttons
* __Imported__ - custom .slangp/.slang shaders you imported (these are NOT persisted between restarts)
* __Community Favorites__ - selection of popular shaders
* __RetroArch Library__ - built-in shaders from libretro repository
* __Next__ - switch to the next Shader
* __Random__ - choose a random Shader
* __Active__ - temporarily switch to 'none' Shader to see the difference (hold TAB)
* __Import custom__ - load and compile an external .slangp/.slang shader
* __Parameters__ - show and modify active shader's parameters
You can save and load profile files which will store all the options. It's also possible to pass profile file path on the command
line and ShaderGlass will load it on startup.
<br/>
### Command Line
```
ShaderGlass.exe [-p|--paused] [-f|--fullscreen] [profile.sgp]
```
You can pass profile filename as a command-line parameter to ShaderGlass.exe and it will be auto-loaded.
If your profile file name contains spaces please put it in quotes.
In addition -p will launch in paused mode, and -f will launch in fullscreen mode.
<br/>
### Tuning
In order to achieve the best effect it's necessary to tune parameters to match your input:
* if you use scaling in your input, use nearest-neighbour (i.e. no smoothing) and set _Input -> Pixel Size_ to match
* moving/resizing the window slightly might also help find the best fit for downscaling pixels
* use Window Clone mode if you can, it's fastest and most compatible; if you need mouse click-through use Glass mode
__Always check that input is crisply pixelated using the "none" shader__ as there is often implicit
scaling happening (for example even when Chrome displays an image at 100%, Windows DPI scaling is still applied).
The none shader should display a pixelated image with no smoothing whatsoever,
try to match Input Pixel Size setting with your input's size to achieve that.
### Parameters
All shaders start using default Parameters as defined by their authors, but you can also tweak them using
_Shader -> Parameters_ menu option.

##### Emulators
Most emulators (DOSBox, FS-UAE, Altirra etc.) will capture mouse by default so you can use them in Window Clone mode.
ShaderGlass window will remain topmost so just position it over the
game window and Alt-Tab to the game to have mouse and focus captured.
##### ScummVM
ScummVM doesn't capture mouse cursor by default so for best results follow below steps:
1) Use Window Clone mode, set Input/Output/Shader options to your liking
2) Switch Output Window to Click-through
3) Click or Alt-Tab to ScummVM game window so that it has focus
4) Press Ctrl-M which will force ScummVM to capture mouse
This way you should have the mouse captured by ScummVM so that it remains within
the game window until you press Ctrl-M again. You can apply output scaling
and/or aspect ratio correction in ShaderGlass and enjoy the game.
<br/>
### Importing Custom Shaders
ShaderGlass comes with a large built-in library of shaders, but you can also import custom ones
written in [RetroArch shader system](https://github.com/libretro/slang-shaders/blob/master/README.md).
It accepts both individual shaders (_.slang_) and multi-pass presets (_.slangp_).
When working on a custom shader, you can use _Recent imports_ menu to quickly reload it.
#### RetroArch shader/preset packs
A lot of preset packs out there rely on base RetroArch shaders so to import them into ShaderGlass
install them into RetroArch first, and then Import from RetroArch's shaders directory.
Please note some shaders might require Vulkan (ShaderGlass is DirectX 11 only) or rely on RetroArch
features that ShaderGlass doesn't support so might not work just as well.
#### Writing your own shaders
ShaderGlass lets you easily experiment with your own shaders! [CustomShader.slang](Misc/CustomShader.slang) is a minimal example
of a shader that swaps color channels and applies a boost, meant as an example from which you could
start writing your own shaders and have them applied to your desktop. Check out
[RetroArch shader repository](https://github.com/libretro/slang-shaders) for tons of examples.
#### Modifying RetroArch shaders
To modify shaders from RetroArch library, download their source code
[from here](https://github.com/mausimus/slang-shaders/archive/refs/heads/shaderglass.zip),
make changes and import.
<br/>
### Frequently Asked Questions
See FAQ [here](FAQ.md).
<br/>
### Code
Built using Visual Studio 2022 using ISO C++ 20, Windows SDK 10.0.26100, Windows Capture API and DirectX 11.
ShaderGlass includes a limited implementation of RetroArch shader back-end.
[ShaderGen](ShaderGen) is a command-line tool for converting Slang shaders
into .h files which can be merged into ShaderGlass. The conversion process requires:
1. [glslang](https://github.com/KhronosGroup/glslang) for converting Slang/GLSL shaders to SPIR-V
2. [SPIR-V cross-compiler](https://github.com/KhronosGroup/SPIRV-Cross) for converting those to HLSL (DX11 format)
3. [Direct3D Shader Compiler (fxc.exe)](https://developer.microsoft.com/en-us/windows/downloads/windows-10-sdk/) for pre-compiling into bytecode
<br/>
### Notices
* ShaderGlass application is provided under [GNU General Public License v3.0](LICENSE)
* Includes precompiled shaders from [libretro/RetroArch shader repository](https://github.com/libretro/slang-shaders).
Please refer to copyright notes within shader code for detailed copyright and license information about each shader.
* App icon courtesy of Icons-Land
* Big kudos to RetroArch team, emulator developers and the wide retro community!
* Thanks to @lonestarr for PRs and everyone for feedback and testing :thumbsup:
", Assign "at most 3 tags" to the expected json: {"id":"13009","tags":[]} "only from the tags list I provide: [{"id":77,"name":"3d"},{"id":89,"name":"agent"},{"id":17,"name":"ai"},{"id":54,"name":"algorithm"},{"id":24,"name":"api"},{"id":44,"name":"authentication"},{"id":3,"name":"aws"},{"id":27,"name":"backend"},{"id":60,"name":"benchmark"},{"id":72,"name":"best-practices"},{"id":39,"name":"bitcoin"},{"id":37,"name":"blockchain"},{"id":1,"name":"blog"},{"id":45,"name":"bundler"},{"id":58,"name":"cache"},{"id":21,"name":"chat"},{"id":49,"name":"cicd"},{"id":4,"name":"cli"},{"id":64,"name":"cloud-native"},{"id":48,"name":"cms"},{"id":61,"name":"compiler"},{"id":68,"name":"containerization"},{"id":92,"name":"crm"},{"id":34,"name":"data"},{"id":47,"name":"database"},{"id":8,"name":"declarative-gui "},{"id":9,"name":"deploy-tool"},{"id":53,"name":"desktop-app"},{"id":6,"name":"dev-exp-lib"},{"id":59,"name":"dev-tool"},{"id":13,"name":"ecommerce"},{"id":26,"name":"editor"},{"id":66,"name":"emulator"},{"id":62,"name":"filesystem"},{"id":80,"name":"finance"},{"id":15,"name":"firmware"},{"id":73,"name":"for-fun"},{"id":2,"name":"framework"},{"id":11,"name":"frontend"},{"id":22,"name":"game"},{"id":81,"name":"game-engine "},{"id":23,"name":"graphql"},{"id":84,"name":"gui"},{"id":91,"name":"http"},{"id":5,"name":"http-client"},{"id":51,"name":"iac"},{"id":30,"name":"ide"},{"id":78,"name":"iot"},{"id":40,"name":"json"},{"id":83,"name":"julian"},{"id":38,"name":"k8s"},{"id":31,"name":"language"},{"id":10,"name":"learning-resource"},{"id":33,"name":"lib"},{"id":41,"name":"linter"},{"id":28,"name":"lms"},{"id":16,"name":"logging"},{"id":76,"name":"low-code"},{"id":90,"name":"message-queue"},{"id":42,"name":"mobile-app"},{"id":18,"name":"monitoring"},{"id":36,"name":"networking"},{"id":7,"name":"node-version"},{"id":55,"name":"nosql"},{"id":57,"name":"observability"},{"id":46,"name":"orm"},{"id":52,"name":"os"},{"id":14,"name":"parser"},{"id":74,"name":"react"},{"id":82,"name":"real-time"},{"id":56,"name":"robot"},{"id":65,"name":"runtime"},{"id":32,"name":"sdk"},{"id":71,"name":"search"},{"id":63,"name":"secrets"},{"id":25,"name":"security"},{"id":85,"name":"server"},{"id":86,"name":"serverless"},{"id":70,"name":"storage"},{"id":75,"name":"system-design"},{"id":79,"name":"terminal"},{"id":29,"name":"testing"},{"id":12,"name":"ui"},{"id":50,"name":"ux"},{"id":88,"name":"video"},{"id":20,"name":"web-app"},{"id":35,"name":"web-server"},{"id":43,"name":"webassembly"},{"id":69,"name":"workflow"},{"id":87,"name":"yaml"}]" returns me the "expected json"