AI prompts
base on An intelligent coding assistant plugin for Visual Studio Code, developed based on CodeShell # CodeShell VSCode Extension
[](README_EN.md)
`codeshell-vscode`项目是基于[CodeShell大模型](https://github.com/WisdomShell/codeshell)开发的支持[Visual Studio Code](https://code.visualstudio.com/Download)的智能编码助手插件,支持python、java、c++/c、javascript、go等多种编程语言,为开发者提供代码补全、代码解释、代码优化、注释生成、对话问答等功能,旨在通过智能化的方式帮助开发者提高编程效率。
## 环境要求
- [node](https://nodejs.org/en)版本v18及以上
- Visual Studio Code版本要求 1.68.1 及以上
- [CodeShell 模型服务](https://github.com/WisdomShell/llama_cpp_for_codeshell)已启动
## 编译插件
如果要从源码进行打包,需要安装 `node` v18 以上版本,并执行以下命令:
```zsh
git clone https://github.com/WisdomShell/codeshell-vscode.git
cd codeshell-vscode
npm install
npm exec vsce package
```
然后会得到一个名为`codeshell-vscode-${VERSION_NAME}.vsix`的文件。
## 模型服务
[`llama_cpp_for_codeshell`](https://github.com/WisdomShell/llama_cpp_for_codeshell)项目提供[CodeShell大模型](https://github.com/WisdomShell/codeshell) 4bits量化后的模型,模型名称为`codeshell-chat-q4_0.gguf`。以下为部署模型服务步骤:
### 编译代码
+ Linux / Mac(Apple Silicon设备)
```bash
git clone https://github.com/WisdomShell/llama_cpp_for_codeshell.git
cd llama_cpp_for_codeshell
make
```
在 macOS 上,默认情况下启用了Metal,启用Metal可以将模型加载到 GPU 上运行,从而显著提升性能。
+ Mac(非Apple Silicon设备)
```bash
git clone https://github.com/WisdomShell/llama_cpp_for_codeshell.git
cd llama_cpp_for_codeshell
LLAMA_NO_METAL=1 make
```
对于非 Apple Silicon 芯片的 Mac 用户,在编译时可以使用 `LLAMA_NO_METAL=1` 或 `LLAMA_METAL=OFF` 的 CMake 选项来禁用Metal构建,从而使模型正常运行。
+ Windows
您可以选择在[Windows Subsystem for Linux](https://learn.microsoft.com/en-us/windows/wsl/about)中按照Linux的方法编译代码,也可以选择参考[llama.cpp仓库](https://github.com/ggerganov/llama.cpp#build)中的方法,配置好[w64devkit](https://github.com/skeeto/w64devkit/releases)后再按照Linux的方法编译。
### 下载模型
在[Hugging Face Hub](https://huggingface.co/WisdomShell)上,我们提供了三种不同的模型,分别是[CodeShell-7B](https://huggingface.co/WisdomShell/CodeShell-7B)、[CodeShell-7B-Chat](https://huggingface.co/WisdomShell/CodeShell-7B-Chat)和[CodeShell-7B-Chat-int4](https://huggingface.co/WisdomShell/CodeShell-7B-Chat-int4)。以下是下载模型的步骤。
- 使用[CodeShell-7B-Chat-int4](https://huggingface.co/WisdomShell/CodeShell-7B-Chat-int4)模型推理,将模型下载到本地后并放置在以上代码中的 `llama_cpp_for_codeshell/models` 文件夹的路径
```
git clone https://huggingface.co/WisdomShell/CodeShell-7B-Chat-int4/blob/main/codeshell-chat-q4_0.gguf
```
- 使用[CodeShell-7B](https://huggingface.co/WisdomShell/CodeShell-7B)、[CodeShell-7B-Chat](https://huggingface.co/WisdomShell/CodeShell-7B-Chat)推理,将模型放置在本地文件夹后,使用[TGI](https://github.com/WisdomShell/text-generation-inference.git)加载本地模型,启动模型服务
```bash
git clone https://huggingface.co/WisdomShell/CodeShell-7B-Chat
git clone https://huggingface.co/WisdomShell/CodeShell-7B
```
### 加载模型
- `CodeShell-7B-Chat-int4`模型使用`llama_cpp_for_codeshell`项目中的`server`命令即可提供API服务
```bash
./server -m ./models/codeshell-chat-q4_0.gguf --host 127.0.0.1 --port 8080
```
注意:对于编译时启用了 Metal 的情况下,若运行时出现异常,您也可以在命令行添加参数 `-ngl 0 `显式地禁用Metal GPU推理,从而使模型正常运行。
- [CodeShell-7B](https://huggingface.co/WisdomShell/CodeShell-7B)和[CodeShell-7B-Chat](https://huggingface.co/WisdomShell/CodeShell-7B-Chat)模型,使用[TGI](https://github.com/WisdomShell/text-generation-inference.git)加载本地模型,启动模型服务
## 模型服务[NVIDIA GPU]
对于希望使用NVIDIA GPU进行推理的用户,可以使用[`text-generation-inference`](https://github.com/huggingface/text-generation-inference)项目部署[CodeShell大模型](https://github.com/WisdomShell/codeshell)。以下为部署模型服务步骤:
### 下载模型
在 [Hugging Face Hub](https://huggingface.co/WisdomShell/CodeShell-7B-Chat)将模型下载到本地后,将模型放置在 `$HOME/models` 文件夹的路径下,即可从本地加载模型。
```bash
git clone https://huggingface.co/WisdomShell/CodeShell-7B-Chat
```
### 部署模型
使用以下命令即可用text-generation-inference进行GPU加速推理部署:
```bash
docker run --gpus 'all' --shm-size 1g -p 9090:80 -v $HOME/models:/data \
--env LOG_LEVEL="info,text_generation_router=debug" \
ghcr.nju.edu.cn/huggingface/text-generation-inference:1.0.3 \
--model-id /data/CodeShell-7B-Chat --num-shard 1 \
--max-total-tokens 5000 --max-input-length 4096 \
--max-stop-sequences 12 --trust-remote-code
```
更详细的参数说明请参考[text-generation-inference项目文档](https://github.com/huggingface/text-generation-inference)。
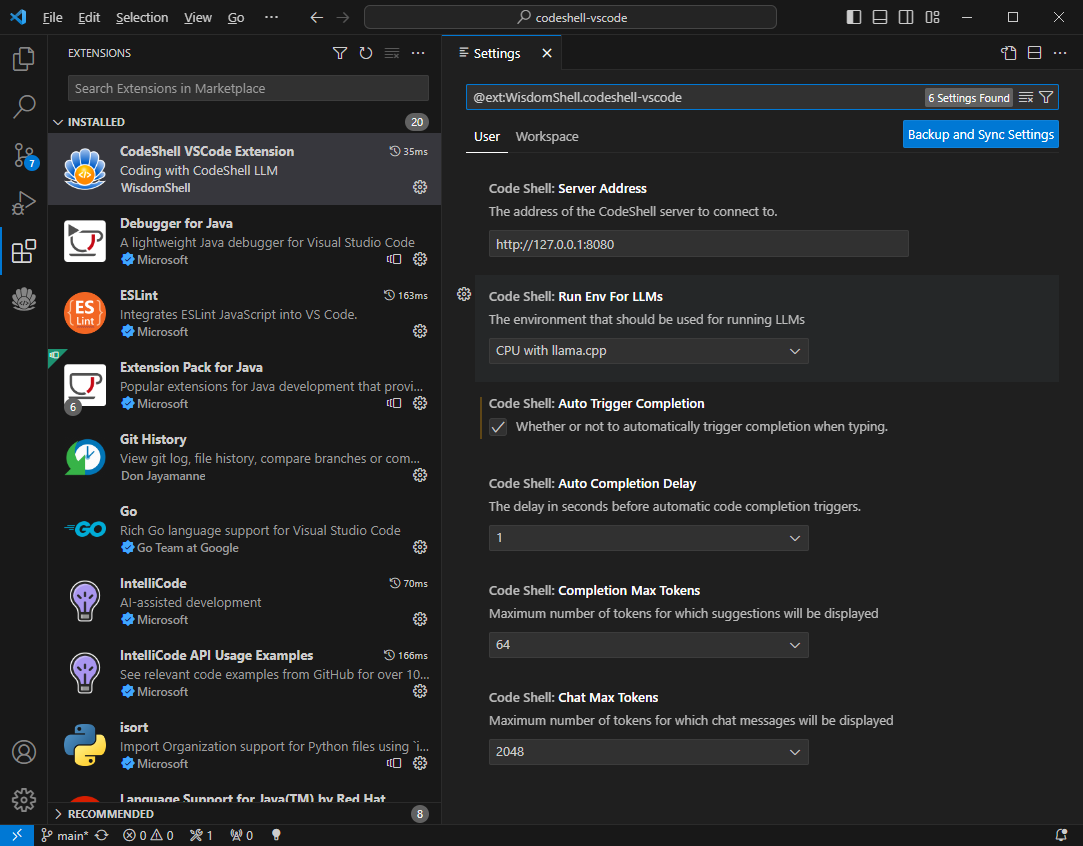
## 配置插件
VSCode中执行`Install from VSIX...`命令,选择`codeshell-vscode-${VERSION_NAME}.vsix`,完成插件安装。
- 设置CodeShell大模型服务地址
- 配置是否自动触发代码补全建议
- 配置自动触发代码补全建议的时间延迟
- 配置补全的最大tokens数量
- 配置问答的最大tokens数量
- 配置模型运行环境
注意:不同的模型运行环境可以在插件中进行配置。对于[CodeShell-7B-Chat-int4](https://huggingface.co/WisdomShell/CodeShell-7B-Chat-int4)模型,您可以在`Code Shell: Run Env For LLMs`选项中选择`CPU with llama.cpp`选项。而对于[CodeShell-7B](https://huggingface.co/WisdomShell/CodeShell-7B)和[CodeShell-7B-Chat](https://huggingface.co/WisdomShell/CodeShell-7B-Chat)模型,应选择`GPU with TGI toolkit`选项。

## 功能特性
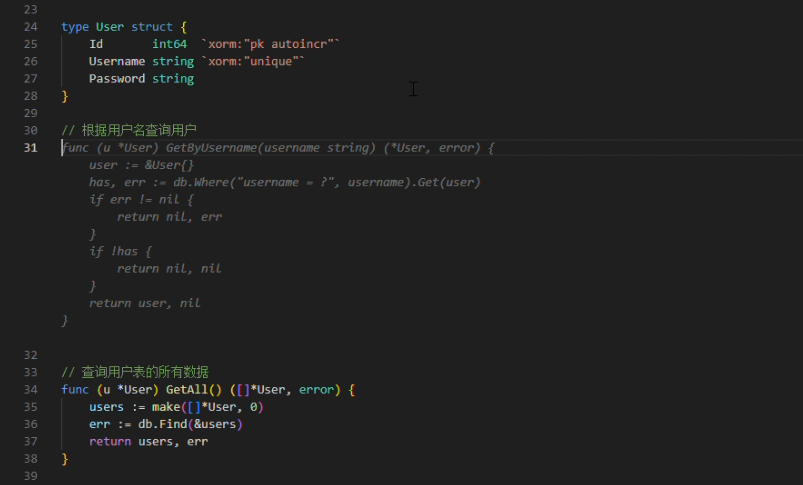
### 1. 代码补全
- 自动触发代码建议
- 热键触发代码建议
在编码过程中,当停止输入时,代码补全建议可自动触发(在配置选项`Auto Completion Delay`中可设置为1~3秒),或者您也可以主动触发代码补全建议,使用快捷键`Alt+\`(对于`Windows`电脑)或`option+\`(对于`Mac`电脑)。
当插件提供代码建议时,建议内容以灰色显示在编辑器光标位置,您可以按下Tab键来接受该建议,或者继续输入以忽略该建议。

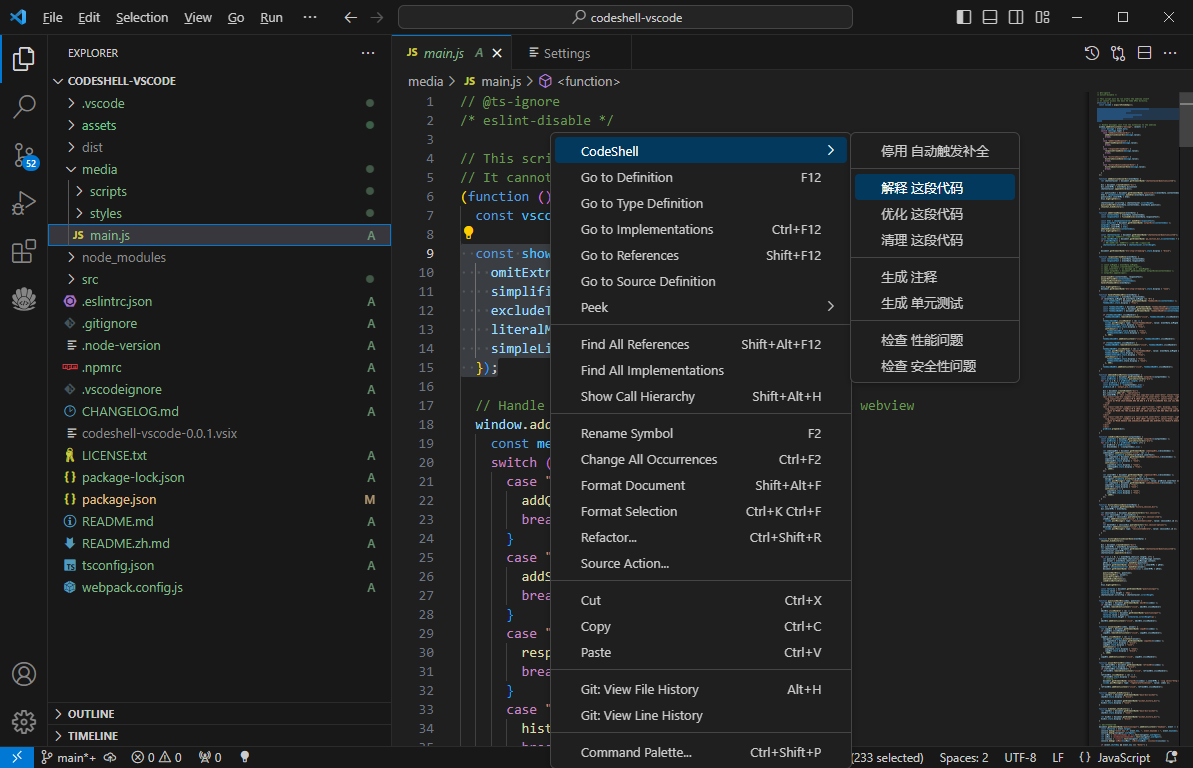
### 2. 代码辅助
- 对一段代码进行解释/优化/清理
- 为一段代码生成注释/单元测试
- 检查一段代码是否存在性能/安全性问题
在vscode侧边栏中打开插件问答界面,在编辑器中选中一段代码,在鼠标右键CodeShell菜单中选择对应的功能项,插件将在问答界面中给出相应的答复。

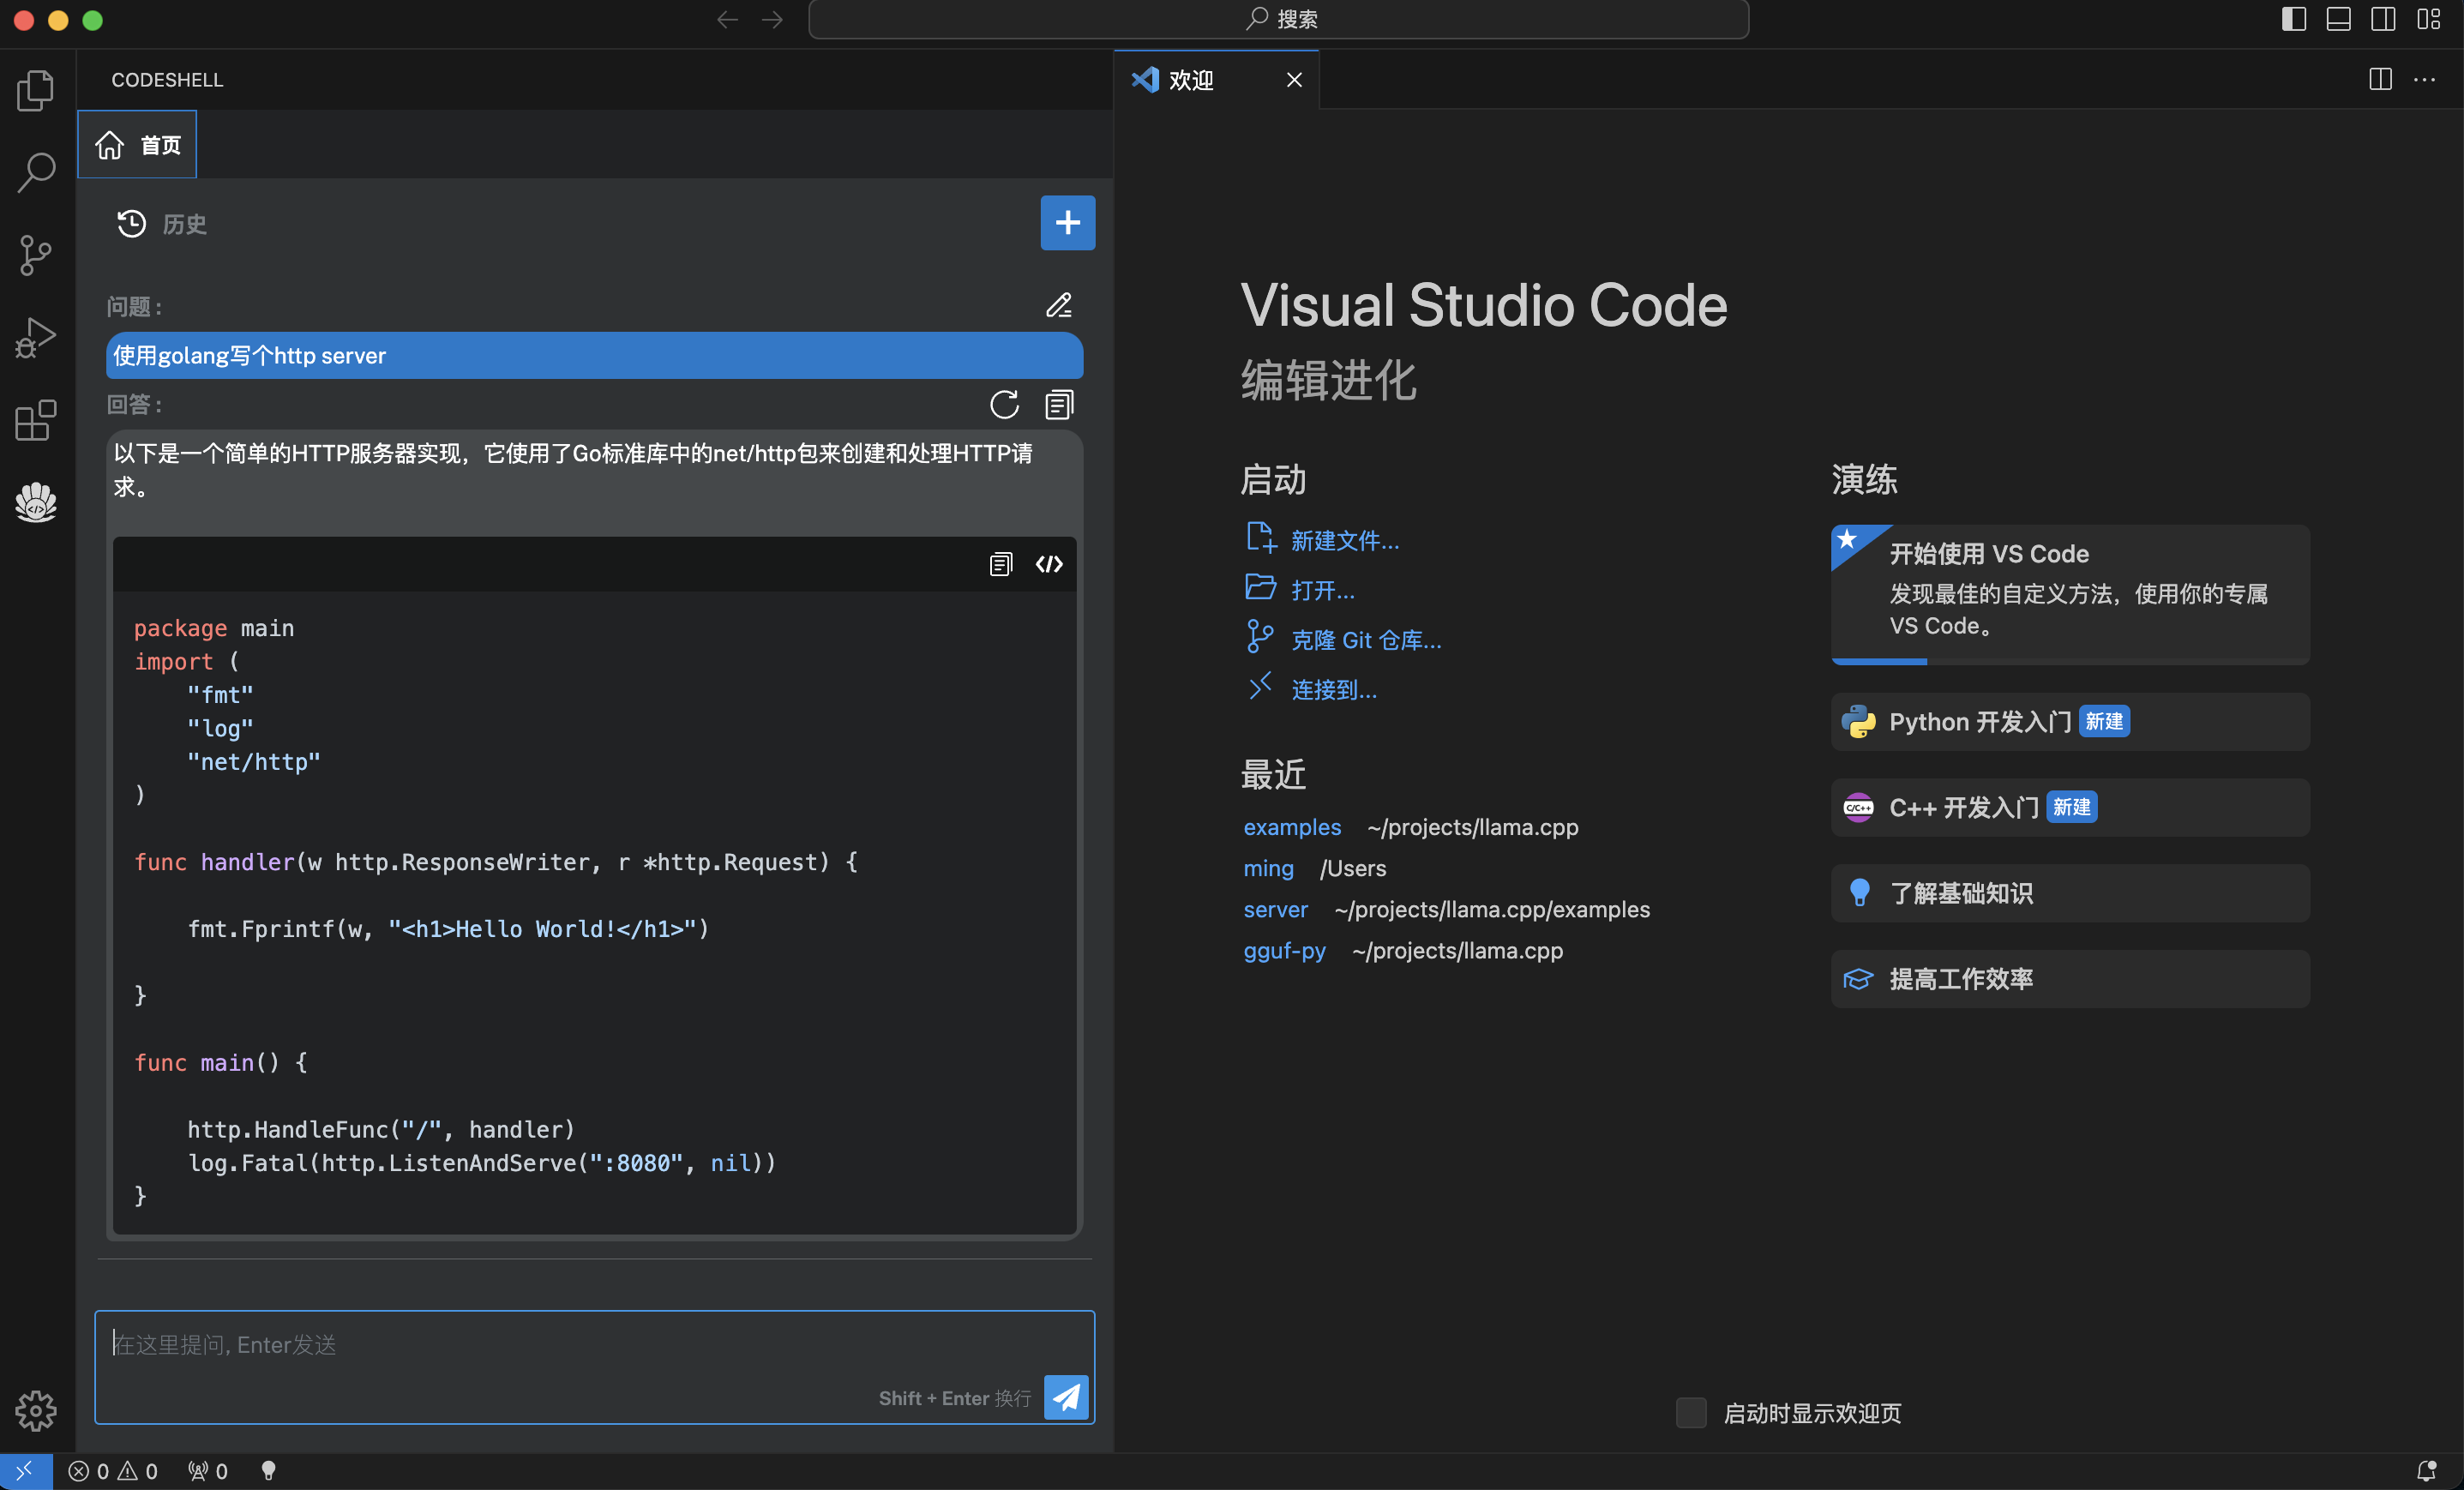
### 3. 智能问答
- 支持多轮对话
- 支持会话历史
- 基于历史会话(做为上文)进行多轮对话
- 可编辑问题,重新提问
- 对任一问题,可重新获取回答
- 在回答过程中,可以打断

在问答界面的代码块中,可以点击复制按钮复制该代码块,也可点击插入按钮将该代码块内容插入到编辑器光标处。
## 开源协议
Apache 2.0
## Star History
[](https://star-history.com/#WisdomShell/codeshell-vscode&Date)", Assign "at most 3 tags" to the expected json: {"id":"3880","tags":[]} "only from the tags list I provide: [{"id":77,"name":"3d"},{"id":89,"name":"agent"},{"id":17,"name":"ai"},{"id":54,"name":"algorithm"},{"id":24,"name":"api"},{"id":44,"name":"authentication"},{"id":3,"name":"aws"},{"id":27,"name":"backend"},{"id":60,"name":"benchmark"},{"id":72,"name":"best-practices"},{"id":39,"name":"bitcoin"},{"id":37,"name":"blockchain"},{"id":1,"name":"blog"},{"id":45,"name":"bundler"},{"id":58,"name":"cache"},{"id":21,"name":"chat"},{"id":49,"name":"cicd"},{"id":4,"name":"cli"},{"id":64,"name":"cloud-native"},{"id":48,"name":"cms"},{"id":61,"name":"compiler"},{"id":68,"name":"containerization"},{"id":92,"name":"crm"},{"id":34,"name":"data"},{"id":47,"name":"database"},{"id":8,"name":"declarative-gui "},{"id":9,"name":"deploy-tool"},{"id":53,"name":"desktop-app"},{"id":6,"name":"dev-exp-lib"},{"id":59,"name":"dev-tool"},{"id":13,"name":"ecommerce"},{"id":26,"name":"editor"},{"id":66,"name":"emulator"},{"id":62,"name":"filesystem"},{"id":80,"name":"finance"},{"id":15,"name":"firmware"},{"id":73,"name":"for-fun"},{"id":2,"name":"framework"},{"id":11,"name":"frontend"},{"id":22,"name":"game"},{"id":81,"name":"game-engine "},{"id":23,"name":"graphql"},{"id":84,"name":"gui"},{"id":91,"name":"http"},{"id":5,"name":"http-client"},{"id":51,"name":"iac"},{"id":30,"name":"ide"},{"id":78,"name":"iot"},{"id":40,"name":"json"},{"id":83,"name":"julian"},{"id":38,"name":"k8s"},{"id":31,"name":"language"},{"id":10,"name":"learning-resource"},{"id":33,"name":"lib"},{"id":41,"name":"linter"},{"id":28,"name":"lms"},{"id":16,"name":"logging"},{"id":76,"name":"low-code"},{"id":90,"name":"message-queue"},{"id":42,"name":"mobile-app"},{"id":18,"name":"monitoring"},{"id":36,"name":"networking"},{"id":7,"name":"node-version"},{"id":55,"name":"nosql"},{"id":57,"name":"observability"},{"id":46,"name":"orm"},{"id":52,"name":"os"},{"id":14,"name":"parser"},{"id":74,"name":"react"},{"id":82,"name":"real-time"},{"id":56,"name":"robot"},{"id":65,"name":"runtime"},{"id":32,"name":"sdk"},{"id":71,"name":"search"},{"id":63,"name":"secrets"},{"id":25,"name":"security"},{"id":85,"name":"server"},{"id":86,"name":"serverless"},{"id":70,"name":"storage"},{"id":75,"name":"system-design"},{"id":79,"name":"terminal"},{"id":29,"name":"testing"},{"id":12,"name":"ui"},{"id":50,"name":"ux"},{"id":88,"name":"video"},{"id":20,"name":"web-app"},{"id":35,"name":"web-server"},{"id":43,"name":"webassembly"},{"id":69,"name":"workflow"},{"id":87,"name":"yaml"}]" returns me the "expected json"