AI prompts
base on Business intelligence made simple # Blazer
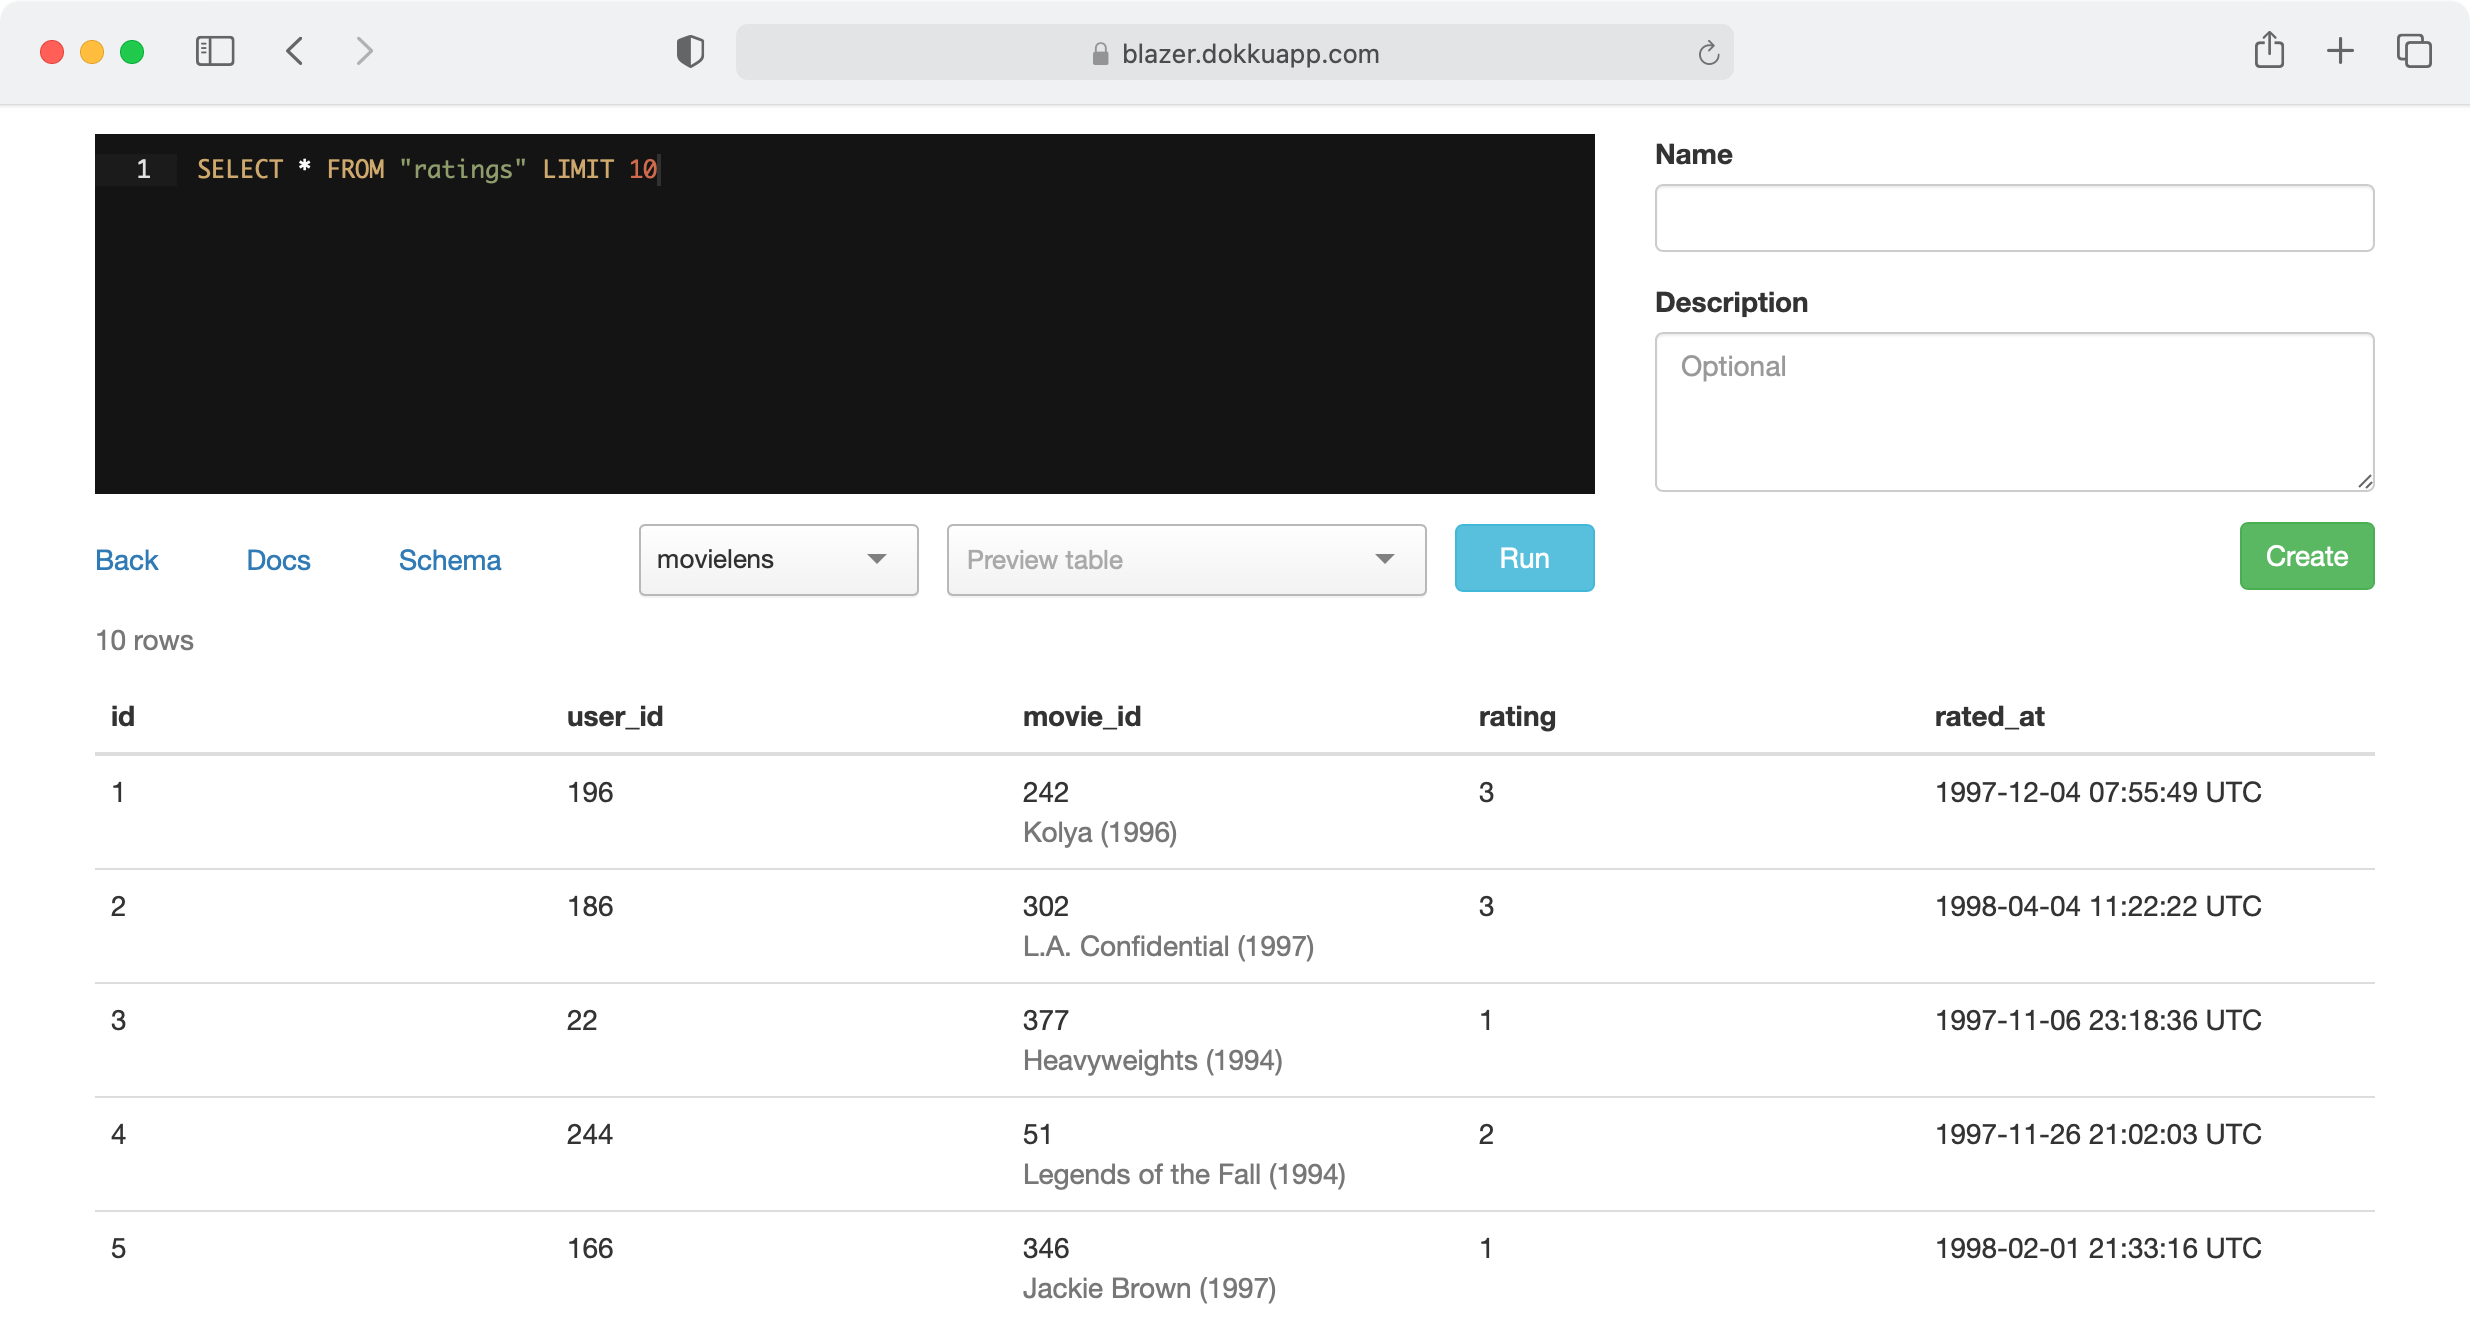
Explore your data with SQL. Easily create charts and dashboards, and share them with your team.
[Try it out](https://blazer.dokkuapp.com)
[](https://blazer.dokkuapp.com)
Blazer is also available as a [Docker image](https://github.com/ankane/blazer-docker).
:tangerine: Battle-tested at [Instacart](https://www.instacart.com/opensource)
[](https://github.com/ankane/blazer/actions)
## Features
- **Multiple data sources** - PostgreSQL, MySQL, Redshift, and [many more](#full-list)
- **Variables** - run the same queries with different values
- **Checks & alerts** - get emailed when bad data appears
- **Audits** - all queries are tracked
- **Security** - works with your authentication system
## Docs
- [Installation](#installation)
- [Queries](#queries)
- [Charts](#charts)
- [Dashboards](#dashboards)
- [Checks](#checks)
- [Cohorts](#cohorts)
- [Anomaly Detection](#anomaly-detection)
- [Forecasting](#forecasting)
- [Uploads](#uploads)
- [Data Sources](#data-sources)
- [Query Permissions](#query-permissions)
## Installation
Add this line to your application’s Gemfile:
```ruby
gem "blazer"
```
Run:
```sh
rails generate blazer:install
rails db:migrate
```
And mount the dashboard in your `config/routes.rb`:
```ruby
mount Blazer::Engine, at: "blazer"
```
For production, specify your database:
```ruby
ENV["BLAZER_DATABASE_URL"] = "postgres://user:password@hostname:5432/database"
```
When possible, Blazer tries to protect against queries which modify data by running each query in a transaction and rolling it back, but a safer approach is to use a read-only user. [See how to create one](#permissions).
#### Checks (optional)
Be sure to set a host in `config/environments/production.rb` for emails to work.
```ruby
config.action_mailer.default_url_options = {host: "blazer.dokkuapp.com"}
```
Schedule checks to run (with cron, Solid Queue, [Heroku Scheduler](https://elements.heroku.com/addons/scheduler), etc). The default options are every 5 minutes, 1 hour, or 1 day, which you can customize. For each of these options, set up a task to run.
```sh
rake blazer:run_checks SCHEDULE="5 minutes"
rake blazer:run_checks SCHEDULE="1 hour"
rake blazer:run_checks SCHEDULE="1 day"
```
You can also set up failing checks to be sent once a day (or whatever you prefer).
```sh
rake blazer:send_failing_checks
```
Here’s what it looks like with cron.
```
*/5 * * * * rake blazer:run_checks SCHEDULE="5 minutes"
0 * * * * rake blazer:run_checks SCHEDULE="1 hour"
30 7 * * * rake blazer:run_checks SCHEDULE="1 day"
0 8 * * * rake blazer:send_failing_checks
```
For Solid Queue, update `config/recurring.yml`.
```yml
production:
blazer_run_checks_5_minutes:
command: "Blazer.run_checks(schedule: '5 minutes')"
schedule: every 5 minutes
blazer_run_checks_1_hour:
command: "Blazer.run_checks(schedule: '1 hour')"
schedule: every hour
blazer_run_checks_1_day:
command: "Blazer.run_checks(schedule: '1 day')"
schedule: every day at 7:30am
blazer_send_failing_checks:
command: "Blazer.send_failing_checks"
schedule: every day at 8am
```
For Slack notifications, create an [incoming webhook](https://slack.com/apps/A0F7XDUAZ-incoming-webhooks) and set:
```sh
BLAZER_SLACK_WEBHOOK_URL=https://hooks.slack.com/...
```
Name the webhook “Blazer” and add a cool icon.
## Authentication
Don’t forget to protect the dashboard in production.
### Basic Authentication
Set the following variables in your environment or an initializer.
```ruby
ENV["BLAZER_USERNAME"] = "andrew"
ENV["BLAZER_PASSWORD"] = "secret"
```
### Devise
```ruby
authenticate :user, ->(user) { user.admin? } do
mount Blazer::Engine, at: "blazer"
end
```
### Other
Specify a `before_action` method to run in `config/blazer.yml`.
```yml
before_action_method: require_admin
```
You can define this method in your `ApplicationController`.
```ruby
def require_admin
# depending on your auth, something like...
redirect_to main_app.root_path unless current_user && current_user.admin?
end
```
Be sure to render or redirect for unauthorized users.
## Permissions
### PostgreSQL
Create a user with read-only permissions:
```sql
BEGIN;
CREATE ROLE blazer LOGIN PASSWORD 'secret';
GRANT CONNECT ON DATABASE dbname TO blazer;
GRANT USAGE ON SCHEMA public TO blazer;
GRANT SELECT ON ALL TABLES IN SCHEMA public TO blazer;
ALTER DEFAULT PRIVILEGES IN SCHEMA public GRANT SELECT ON TABLES TO blazer;
COMMIT;
```
### MySQL and MariaDB
Create a user with read-only permissions:
```sql
CREATE USER 'blazer'@'127.0.0.1' IDENTIFIED BY 'secret';
GRANT SELECT, SHOW VIEW ON dbname.* TO 'blazer'@'127.0.0.1';
FLUSH PRIVILEGES;
```
## Sensitive Data
If your database contains sensitive or personal data, check out [Hypershield](https://github.com/ankane/hypershield) to shield it.
## Encrypted Data
If you need to search encrypted data, use [blind indexing](https://github.com/ankane/blind_index).
You can have Blazer transform specific variables with:
```ruby
Blazer.transform_variable = lambda do |name, value|
value = User.generate_email_bidx(value) if name == "email_bidx"
value
end
```
## Queries
### Variables
Create queries with variables.
```sql
SELECT * FROM users WHERE gender = {gender}
```
Use `{start_time}` and `{end_time}` for time ranges. [Example](https://blazer.dokkuapp.com/queries/9-time-range-selector?start_time=1997-10-03T05%3A00%3A00%2B00%3A00&end_time=1997-10-04T04%3A59%3A59%2B00%3A00)
```sql
SELECT * FROM ratings WHERE rated_at >= {start_time} AND rated_at <= {end_time}
```
### Smart Variables
[Example](https://blazer.dokkuapp.com/queries/1-smart-variable)
Suppose you have the query:
```sql
SELECT * FROM users WHERE occupation_id = {occupation_id}
```
Instead of remembering each occupation’s id, users can select occupations by name.
Add a smart variable in `config/blazer.yml` with:
```yml
smart_variables:
occupation_id: "SELECT id, name FROM occupations ORDER BY name ASC"
```
The first column is the value of the variable, and the second column is the label.
You can also use an array or hash for static data and enums.
```yml
smart_variables:
period: ["day", "week", "month"]
status: {0: "Active", 1: "Archived"}
```
### Linked Columns
[Example](https://blazer.dokkuapp.com/queries/3-linked-column) - title column
Link results to other pages in your apps or around the web. Specify a column name and where it should link to. You can use the value of the result with `{value}`.
```yml
linked_columns:
user_id: "/admin/users/{value}"
ip_address: "https://www.infosniper.net/index.php?ip_address={value}"
```
### Smart Columns
[Example](https://blazer.dokkuapp.com/queries/2-smart-column) - occupation_id column
Suppose you have the query:
```sql
SELECT name, city_id FROM users
```
See which city the user belongs to without a join.
```yml
smart_columns:
city_id: "SELECT id, name FROM cities WHERE id IN {value}"
```
You can also use a hash for static data and enums.
```yml
smart_columns:
status: {0: "Active", 1: "Archived"}
```
### Caching
Blazer can automatically cache results to improve speed. It can cache slow queries:
```yml
cache:
mode: slow
expires_in: 60 # min
slow_threshold: 15 # sec
```
Or it can cache all queries:
```yml
cache:
mode: all
expires_in: 60 # min
```
Of course, you can force a refresh at any time.
## Charts
Blazer will automatically generate charts based on the types of the columns returned in your query.
**Note:** The order of columns matters.
### Line Chart
There are two ways to generate line charts.
2+ columns - timestamp, numeric(s) - [Example](https://blazer.dokkuapp.com/queries/4-line-chart-format-1)
```sql
SELECT date_trunc('week', created_at), COUNT(*) FROM users GROUP BY 1
```
3 columns - timestamp, string, numeric - [Example](https://blazer.dokkuapp.com/queries/5-line-chart-format-2)
```sql
SELECT date_trunc('week', created_at), gender, COUNT(*) FROM users GROUP BY 1, 2
```
### Column Chart
There are also two ways to generate column charts.
2+ columns - string, numeric(s) - [Example](https://blazer.dokkuapp.com/queries/6-column-chart-format-1)
```sql
SELECT gender, COUNT(*) FROM users GROUP BY 1
```
3 columns - string, string, numeric - [Example](https://blazer.dokkuapp.com/queries/7-column-chart-format-2)
```sql
SELECT gender, zip_code, COUNT(*) FROM users GROUP BY 1, 2
```
### Scatter Chart
2 columns - both numeric - [Example](https://blazer.dokkuapp.com/queries/16-scatter-chart)
```sql
SELECT x, y FROM table
```
### Pie Chart
2 columns - string, numeric - and last column named `pie` - [Example](https://blazer.dokkuapp.com/queries/17-pie-chart)
```sql
SELECT gender, COUNT(*) AS pie FROM users GROUP BY 1
```
### Maps
Columns named `latitude` and `longitude` or `lat` and `lon` or `lat` and `lng` - [Example](https://blazer.dokkuapp.com/queries/15-map)
```sql
SELECT name, latitude, longitude FROM cities
```
or a column named `geojson`
```sql
SELECT name, geojson FROM counties
```
To enable, get an access token from [Mapbox](https://www.mapbox.com/) and set `ENV["MAPBOX_ACCESS_TOKEN"]`.
### Targets
Use the column name `target` to draw a line for goals. [Example](https://blazer.dokkuapp.com/queries/8-target-line)
```sql
SELECT date_trunc('week', created_at), COUNT(*) AS new_users, 100000 AS target FROM users GROUP BY 1
```
## Dashboards
Create a dashboard with multiple queries. [Example](https://blazer.dokkuapp.com/dashboards/1-dashboard-demo)
If the query has a chart, the chart is shown. Otherwise, you’ll see a table.
If any queries have variables, they will show up on the dashboard.
## Checks
Checks give you a centralized place to see the health of your data. [Example](https://blazer.dokkuapp.com/checks)
Create a query to identify bad rows.
```sql
SELECT * FROM ratings WHERE user_id IS NULL /* all ratings should have a user */
```
Then create check with optional emails if you want to be notified. Emails are sent when a check starts failing, and when it starts passing again.
## Cohorts
Create a cohort analysis from a simple SQL query. [Example](https://blazer.dokkuapp.com/queries/19-cohort-analysis-from-first-order)
Create a query with the comment `/* cohort analysis */`. The result should have columns named `user_id` and `conversion_time` and optionally `cohort_time`.
You can generate cohorts from the first conversion time:
```sql
/* cohort analysis */
SELECT user_id, created_at AS conversion_time FROM orders
```
(the first conversion isn’t counted in the first time period with this format)
Or from another time, like sign up:
```sql
/* cohort analysis */
SELECT users.id AS user_id, orders.created_at AS conversion_time, users.created_at AS cohort_time
FROM users LEFT JOIN orders ON orders.user_id = users.id
```
This feature requires PostgreSQL or MySQL 8.
## Anomaly Detection
Blazer supports three different approaches to anomaly detection.
### Prophet
Add [prophet-rb](https://github.com/ankane/prophet) to your Gemfile:
```ruby
gem "prophet-rb"
```
And add to `config/blazer.yml`:
```yml
anomaly_checks: prophet
```
### Trend
Add [trend](https://github.com/ankane/trend) to your Gemfile:
```ruby
gem "trend"
```
Set the URL to the [API](https://github.com/ankane/trend-api) in an initializer:
```ruby
Trend.url = "http://localhost:8000"
```
And add to `config/blazer.yml`:
```yml
anomaly_checks: trend
```
### AnomalyDetection.rb
Add [anomaly_detection](https://github.com/ankane/AnomalyDetection.rb) to your Gemfile:
```ruby
gem "anomaly_detection"
```
And add to `config/blazer.yml`:
```yml
anomaly_checks: anomaly_detection
```
## Forecasting
Blazer supports for two different forecasting methods. [Example](https://blazer.dokkuapp.com/queries/18-forecast?forecast=t)
A forecast link will appear for queries that return 2 columns with types timestamp and numeric.
### Prophet
Add [prophet-rb](https://github.com/ankane/prophet) to your Gemfile:
```ruby
gem "prophet-rb", ">= 0.2.1"
```
And add to `config/blazer.yml`:
```yml
forecasting: prophet
```
### Trend
Add [trend](https://github.com/ankane/trend) to your Gemfile:
```ruby
gem "trend"
```
Set the URL to the [API](https://github.com/ankane/trend-api) in an initializer:
```ruby
Trend.url = "http://localhost:8000"
```
And add to `config/blazer.yml`:
```yml
forecasting: trend
```
## Uploads
Create database tables from CSV files. [Example](https://blazer.dokkuapp.com/uploads)
Run:
```sh
rails generate blazer:uploads
rails db:migrate
```
And add to `config/blazer.yml`:
```yml
uploads:
url: postgres://...
schema: uploads
data_source: main
```
This feature requires PostgreSQL. Create a new schema just for uploads.
```sql
CREATE SCHEMA uploads;
```
## Data Sources
Blazer supports multiple data sources :tada:
Add additional data sources in `config/blazer.yml`:
```yml
data_sources:
main:
url: <%= ENV["BLAZER_DATABASE_URL"] %>
# timeout, smart_variables, linked_columns, smart_columns
catalog:
url: <%= ENV["CATALOG_DATABASE_URL"] %>
# ...
redshift:
url: <%= ENV["REDSHIFT_DATABASE_URL"] %>
# ...
```
### Full List
- [Amazon Athena](#amazon-athena)
- [Amazon Redshift](#amazon-redshift)
- [Apache Drill](#apache-drill)
- [Apache Hive](#apache-hive)
- [Apache Ignite](#apache-ignite)
- [Apache Spark](#apache-spark)
- [Cassandra](#cassandra)
- [Druid](#druid)
- [Elasticsearch](#elasticsearch)
- [Google BigQuery](#google-bigquery)
- [IBM DB2 and Informix](#ibm-db2-and-informix)
- [InfluxDB](#influxdb)
- [MySQL and MariaDB](#mysql-and-mariadb-1)
- [Neo4j](#neo4j)
- [OpenSearch](#opensearch)
- [Oracle](#oracle)
- [PostgreSQL](#postgresql-1)
- [Presto and Trino](#presto-and-trino)
- [Salesforce](#salesforce)
- [Snowflake](#snowflake)
- [Socrata Open Data API (SODA)](#socrata-open-data-api-soda)
- [SQLite](#sqlite)
- [SQL Server](#sql-server)
You can also [create an adapter](#creating-an-adapter) for any other data store.
**Note:** In the examples below, we recommend using environment variables for urls.
```yml
data_sources:
my_source:
url: <%= ENV["BLAZER_MY_SOURCE_URL"] %>
```
### Amazon Athena
Add [aws-sdk-athena](https://github.com/aws/aws-sdk-ruby) and [aws-sdk-glue](https://github.com/aws/aws-sdk-ruby) to your Gemfile and set:
```yml
data_sources:
my_source:
adapter: athena
database: database
# optional settings
output_location: s3://some-bucket/
workgroup: primary
access_key_id: ...
secret_access_key: ...
region: ...
```
Here’s an example IAM policy:
```json
{
"Version": "2012-10-17",
"Statement": [
{
"Effect": "Allow",
"Action": [
"athena:GetQueryExecution",
"athena:GetQueryResults",
"athena:StartQueryExecution"
],
"Resource": [
"arn:aws:athena:region:account-id:workgroup/primary"
]
},
{
"Effect": "Allow",
"Action": [
"glue:GetTable",
"glue:GetTables"
],
"Resource": [
"arn:aws:glue:region:account-id:catalog",
"arn:aws:glue:region:account-id:database/default",
"arn:aws:glue:region:account-id:table/default/*"
]
}
]
}
```
You also need to configure [S3 permissions](https://repost.aws/knowledge-center/access-denied-athena).
### Amazon Redshift
Add [activerecord7-redshift-adapter-pennylane](https://github.com/pennylane-hq/activerecord-adapter-redshift) to your Gemfile and set:
```yml
data_sources:
my_source:
url: redshift://user:password@hostname:5439/database
```
Use a [read-only user](https://docs.aws.amazon.com/redshift/latest/dg/r_GRANT.html).
### Apache Drill
Add [drill-sergeant](https://github.com/ankane/drill-sergeant) to your Gemfile and set:
```yml
data_sources:
my_source:
adapter: drill
url: http://hostname:8047
```
Use a [read-only user](https://drill.apache.org/docs/roles-and-privileges/).
### Apache Hive
Add [hexspace](https://github.com/ankane/hexspace) to your Gemfile and set:
```yml
data_sources:
my_source:
adapter: hive
url: sasl://user:password@hostname:10000/database
```
Use a [read-only user](https://cwiki.apache.org/confluence/display/Hive/LanguageManual+Authorization). Requires [HiveServer2](https://cwiki.apache.org/confluence/display/Hive/Setting+Up+HiveServer2).
### Apache Ignite
Add [ignite-client](https://github.com/ankane/ignite-ruby) to your Gemfile and set:
```yml
data_sources:
my_source:
url: ignite://user:password@hostname:10800
```
Use a [read-only user](https://www.gridgain.com/docs/latest/administrators-guide/security/authorization-permissions) (requires a third-party plugin).
### Apache Spark
Add [hexspace](https://github.com/ankane/hexspace) to your Gemfile and set:
```yml
data_sources:
my_source:
adapter: spark
url: sasl://user:password@hostname:10000/database
```
Use a read-only user. Requires the [Thrift server](https://spark.apache.org/docs/latest/sql-distributed-sql-engine.html).
### Cassandra
Add [cassandra-driver](https://github.com/datastax/ruby-driver) and [sorted_set](https://github.com/knu/sorted_set) to your Gemfile and set:
```yml
data_sources:
my_source:
url: cassandra://user:password@hostname:9042/keyspace
```
Use a [read-only role](https://docs.datastax.com/en/cql-oss/3.3/cql/cql_using/useSecurePermission.html).
### Druid
Enable [SQL support](https://druid.apache.org/docs/latest/querying/sql) on the broker and set:
```yml
data_sources:
my_source:
adapter: druid
url: http://hostname:8082
```
Use a [read-only role](https://druid.apache.org/docs/latest/development/extensions-core/druid-basic-security.html).
### Elasticsearch
Add [elasticsearch](https://github.com/elastic/elasticsearch-ruby) to your Gemfile and set:
```yml
data_sources:
my_source:
adapter: elasticsearch
url: http://user:password@hostname:9200
```
Use a [read-only role](https://www.elastic.co/guide/en/elasticsearch/reference/current/security-privileges.html).
### Google BigQuery
Add [google-cloud-bigquery](https://github.com/GoogleCloudPlatform/google-cloud-ruby/tree/main/google-cloud-bigquery) to your Gemfile and set:
```yml
data_sources:
my_source:
adapter: bigquery
project: your-project
keyfile: path/to/keyfile.json
```
### IBM DB2 and Informix
Add [ibm_db](https://github.com/ibmdb/ruby-ibmdb) to your Gemfile and set:
```yml
data_sources:
my_source:
url: ibm-db://user:password@hostname:50000/database
```
Use a [read-only user](https://www.ibm.com/support/pages/creating-read-only-database-permissions-user).
### InfluxDB
Add [influxdb](https://github.com/influxdata/influxdb-ruby) to your Gemfile and set:
```yml
data_sources:
my_source:
adapter: influxdb
url: http://user:password@hostname:8086/database
```
Use a [read-only user](https://docs.influxdata.com/influxdb/v1.8/administration/authentication_and_authorization/). Supports [InfluxQL](https://docs.influxdata.com/influxdb/v1.8/query_language/explore-data/).
### MySQL and MariaDB
Add [mysql2](https://github.com/brianmario/mysql2) to your Gemfile (if it’s not there) and set:
```yml
data_sources:
my_source:
url: mysql2://user:password@hostname:3306/database
```
Use a [read-only user](#mysql-and-mariadb).
### Neo4j
Add [neo4j-ruby-driver](https://github.com/neo4jrb/neo4j-ruby-driver) to your Gemfile and set:
```yml
data_sources:
my_source:
adapter: neo4j
url: bolt://user:password@hostname:7687/database
```
Use a [read-only user](https://neo4j.com/docs/cypher-manual/current/access-control/manage-privileges/).
### OpenSearch
Add [opensearch-ruby](https://github.com/opensearch-project/opensearch-ruby) to your Gemfile and set:
```yml
data_sources:
my_source:
adapter: opensearch
url: http://user:password@hostname:9200
```
Use a [read-only user](https://opensearch.org/docs/latest/security-plugin/access-control/permissions/).
### Oracle
Add [activerecord-oracle_enhanced-adapter](https://github.com/rsim/oracle-enhanced) and [ruby-oci8](https://github.com/kubo/ruby-oci8) to your Gemfile and set:
```yml
data_sources:
my_source:
url: oracle-enhanced://user:password@hostname:1521/database
```
Use a [read-only user](https://docs.oracle.com/cd/B19306_01/network.102/b14266/authoriz.htm).
### PostgreSQL
Add [pg](https://github.com/ged/ruby-pg) to your Gemfile (if it’s not there) and set:
```yml
data_sources:
my_source:
url: postgres://user:password@hostname:5432/database
```
Use a [read-only user](#postgresql).
### Presto and Trino
Add [presto-client](https://github.com/treasure-data/trino-client-ruby/tree/v0.6.5) or [trino-client](https://github.com/treasure-data/trino-client-ruby) to your Gemfile and set:
```yml
data_sources:
my_source:
url: presto://user@hostname:8080/catalog
# or
url: trino://user@hostname:8080/catalog
```
Use a read-only user for [Presto](https://prestodb.io/docs/current/security/built-in-system-access-control.html) or [Trino](https://trino.io/docs/current/security/built-in-system-access-control.html).
### Salesforce
Add [restforce](https://github.com/restforce/restforce) to your Gemfile and set:
```yml
data_sources:
my_source:
adapter: salesforce
```
And set the appropriate environment variables:
```sh
SALESFORCE_USERNAME="username"
SALESFORCE_PASSWORD="password"
SALESFORCE_SECURITY_TOKEN="security token"
SALESFORCE_CLIENT_ID="client id"
SALESFORCE_CLIENT_SECRET="client secret"
SALESFORCE_API_VERSION="41.0"
```
Use a read-only user. Supports [SOQL](https://developer.salesforce.com/docs/atlas.en-us.soql_sosl.meta/soql_sosl/sforce_api_calls_soql.htm).
### Snowflake
First, install ODBC. For Homebrew, use:
```sh
brew install unixodbc
```
For Ubuntu, use:
```sh
sudo apt-get install unixodbc-dev
```
For Heroku, use the [Apt buildpack](https://github.com/heroku/heroku-buildpack-apt) and create an `Aptfile` with:
```text
unixodbc-dev
https://sfc-repo.snowflakecomputing.com/odbc/linux/2.21.5/snowflake-odbc-2.21.5.x86_64.deb
```
> This installs the driver at `/app/.apt/usr/lib/snowflake/odbc/lib/libSnowflake.so`
Then, download the [Snowflake ODBC driver](https://docs.snowflake.com/developer-guide/odbc/odbc-download). Add [odbc_adapter](https://github.com/localytics/odbc_adapter) to your Gemfile and set:
```yml
data_sources:
my_source:
adapter: snowflake
conn_str: Driver=/path/to/libSnowflake.so;uid=user;pwd=password;server=host.snowflakecomputing.com
```
Use a [read-only role](https://docs.snowflake.com/en/user-guide/security-access-control-configure.html).
### Socrata Open Data API (SODA)
Set:
```yml
data_sources:
my_source:
adapter: soda
url: https://soda.demo.socrata.com/resource/4tka-6guv.json
app_token: ...
```
Supports [SoQL](https://dev.socrata.com/docs/functions/).
### SQLite
Add [sqlite3](https://github.com/sparklemotion/sqlite3-ruby) to your Gemfile and set:
```yml
data_sources:
my_source:
url: sqlite3:path/to/database.sqlite3
```
### SQL Server
Add [tiny_tds](https://github.com/rails-sqlserver/tiny_tds) and [activerecord-sqlserver-adapter](https://github.com/rails-sqlserver/activerecord-sqlserver-adapter) to your Gemfile and set:
```yml
data_sources:
my_source:
url: sqlserver://user:password@hostname:1433/database
```
Use a [read-only user](https://docs.microsoft.com/en-us/sql/relational-databases/security/authentication-access/getting-started-with-database-engine-permissions?view=sql-server-ver15).
## Creating an Adapter
Create an adapter for any data store with:
```ruby
class FooAdapter < Blazer::Adapters::BaseAdapter
# code goes here
end
Blazer.register_adapter "foo", FooAdapter
```
See the [Presto adapter](https://github.com/ankane/blazer/blob/master/lib/blazer/adapters/presto_adapter.rb) for a good example. Then use:
```yml
data_sources:
my_source:
adapter: foo
url: http://user:password@hostname:9200/
```
## Query Permissions
Blazer supports a basic permissions model.
1. Queries without a name are unlisted
2. Queries whose name starts with `#` are only listed to the creator
3. Queries whose name starts with `*` can only be edited by the creator
## Learn SQL
Have team members who want to learn SQL? Here are a few great, free resources.
- [The Data School](https://dataschool.com/learn-sql/)
- [SQLBolt](https://sqlbolt.com/)
## Useful Tools
For an easy way to group by day, week, month, and more with correct time zones, check out [Groupdate.sql](https://github.com/ankane/groupdate.sql).
## Performance
By default, queries take up a request while they are running. To run queries asynchronously, add to your config:
```yml
async: true
```
**Note:** Requires caching to be enabled. If you have multiple web processes, your app must use a centralized cache store like Memcached or Redis.
```ruby
config.cache_store = :mem_cache_store
```
## Archiving
Archive queries that haven’t been viewed in over 90 days.
```sh
rake blazer:archive_queries
```
## Content Security Policy
If views are stuck with a `Loading...` message, there might be a problem with strict CSP settings in your app. This can be checked with Firefox or Chrome dev tools. You can allow Blazer to override these settings for its controllers with:
```yml
override_csp: true
```
## History
View the [changelog](https://github.com/ankane/blazer/blob/master/CHANGELOG.md)
## Thanks
Blazer uses a number of awesome open source projects, including [Rails](https://github.com/rails/rails/), [Vue.js](https://github.com/vuejs/vue), [jQuery](https://github.com/jquery/jquery), [Bootstrap](https://github.com/twbs/bootstrap), [Selectize](https://github.com/brianreavis/selectize.js), [StickyTableHeaders](https://github.com/jmosbech/StickyTableHeaders), [Stupid jQuery Table Sort](https://github.com/joequery/Stupid-Table-Plugin), and [Date Range Picker](https://github.com/dangrossman/bootstrap-daterangepicker).
Demo data from [MovieLens](https://grouplens.org/datasets/movielens/).
## Want to Make Blazer Better?
That’s awesome! Here are a few ways you can help:
- [Report bugs](https://github.com/ankane/blazer/issues)
- Fix bugs and [submit pull requests](https://github.com/ankane/blazer/pulls)
- Write, clarify, or fix documentation
- Suggest or add new features
Check out the [dev app](https://github.com/ankane/blazer-dev) to get started.
", Assign "at most 3 tags" to the expected json: {"id":"8169","tags":[]} "only from the tags list I provide: [{"id":39,"name":"3d-generation","display_name":"3D generation","slug":"3d-generation"},{"id":3,"name":"ai-agent","display_name":"AI agent","slug":"ai-agent"},{"id":8,"name":"ai-coding","display_name":"AI coding assistant","slug":"ai-coding"},{"id":5,"name":"ai-image","display_name":"AI image generation","slug":"ai-image"},{"id":9,"name":"ai-infrastructure","display_name":"AI infrastructure","slug":"ai-infrastructure"},{"id":10,"name":"ai-memory","display_name":"AI memory","slug":"ai-memory"},{"id":11,"name":"ai-skills","display_name":"AI skills","slug":"ai-skills"},{"id":12,"name":"ai-translation","display_name":"AI translation","slug":"ai-translation"},{"id":6,"name":"ai-video","display_name":"AI video generation","slug":"ai-video"},{"id":4,"name":"ai-voice","display_name":"AI voice","slug":"ai-voice"},{"id":7,"name":"ai-workflow","display_name":"AI workflow","slug":"ai-workflow"},{"id":22,"name":"audio-processing","display_name":"Audio processing","slug":"audio-processing"},{"id":29,"name":"authentication","display_name":"Authentication","slug":"authentication"},{"id":51,"name":"bundler","display_name":"Bundler","slug":"bundler"},{"id":41,"name":"chatbot","display_name":"Chatbot","slug":"chatbot"},{"id":27,"name":"cloud-native","display_name":"Cloud native","slug":"cloud-native"},{"id":1,"name":"computer-vision","display_name":"Computer vision","slug":"computer-vision"},{"id":37,"name":"crypto-trading","display_name":"Crypto trading","slug":"crypto-trading"},{"id":57,"name":"curated-list","display_name":"Curated list","slug":"curated-list"},{"id":54,"name":"data-streaming","display_name":"Data streaming","slug":"data-streaming"},{"id":35,"name":"data-visualization","display_name":"Data visualization","slug":"data-visualization"},{"id":16,"name":"database-backup","display_name":"Database backup","slug":"database-backup"},{"id":49,"name":"design-system","display_name":"Design system","slug":"design-system"},{"id":38,"name":"digital-human","display_name":"Digital human","slug":"digital-human"},{"id":34,"name":"document-processing","display_name":"Document processing","slug":"document-processing"},{"id":44,"name":"ecommerce","display_name":"E-commerce","slug":"ecommerce"},{"id":45,"name":"emulator","display_name":"Emulator","slug":"emulator"},{"id":46,"name":"file-management","display_name":"File management","slug":"file-management"},{"id":32,"name":"fintech","display_name":"Fintech","slug":"fintech"},{"id":31,"name":"game-development","display_name":"Game development","slug":"game-development"},{"id":24,"name":"headless-browser","display_name":"Headless browser","slug":"headless-browser"},{"id":52,"name":"headless-cms","display_name":"Headless CMS","slug":"headless-cms"},{"id":36,"name":"home-automation","display_name":"Home automation","slug":"home-automation"},{"id":20,"name":"image-editing","display_name":"Image editing","slug":"image-editing"},{"id":28,"name":"iot","display_name":"IoT","slug":"iot"},{"id":13,"name":"local-llm","display_name":"Local LLM","slug":"local-llm"},{"id":17,"name":"mcp","display_name":"MCP","slug":"mcp"},{"id":47,"name":"monitoring","display_name":"Monitoring","slug":"monitoring"},{"id":2,"name":"nlp","display_name":"NLP","slug":"nlp"},{"id":26,"name":"observability","display_name":"Observability","slug":"observability"},{"id":40,"name":"pentesting","display_name":"Pentesting","slug":"pentesting"},{"id":48,"name":"programming-examples","display_name":"Programming examples","slug":"programming-examples"},{"id":42,"name":"proxy","display_name":"Proxy","slug":"proxy"},{"id":14,"name":"rag","display_name":"RAG","slug":"rag"},{"id":56,"name":"resume-building","display_name":"Resume building","slug":"resume-building"},{"id":33,"name":"robotics","display_name":"Robotics","slug":"robotics"},{"id":30,"name":"search","display_name":"Search","slug":"search"},{"id":43,"name":"self-hosted","display_name":"Self-hosted","slug":"self-hosted"},{"id":50,"name":"static-analysis","display_name":"Static analysis","slug":"static-analysis"},{"id":18,"name":"synthetic-data","display_name":"Synthetic data","slug":"synthetic-data"},{"id":19,"name":"text-to-speech","display_name":"Text to speech","slug":"text-to-speech"},{"id":53,"name":"ui-components","display_name":"UI components","slug":"ui-components"},{"id":15,"name":"vector-database","display_name":"Vector database","slug":"vector-database"},{"id":21,"name":"video-editing","display_name":"Video editing","slug":"video-editing"},{"id":25,"name":"web-scraping","display_name":"Web scraping","slug":"web-scraping"},{"id":55,"name":"webassembly","display_name":"WebAssembly","slug":"webassembly"},{"id":23,"name":"workflow-automation","display_name":"Workflow automation","slug":"workflow-automation"}]" returns me the "expected json"